Creation of Callouts on the Drawing |
  
|
Creation of Callouts on the Drawing |
|
You can create callouts using command:
Icon |
Ribbon |
|---|---|
|
Bill of materials → Positions→ Callouts |
Keyboard |
Textual Menu |
<BL> |
Tools > Report/Bill of materials > Callouts |
There are three options in the automenu:
|
<W> |
Show product structure window |
|
<A> |
Create All Callouts |
|
<Esc> |
Exit command |
If ![]() Show product structure window option is active, Product structure window will appear.
Show product structure window option is active, Product structure window will appear.
There are two ways to create callouts after calling the command:
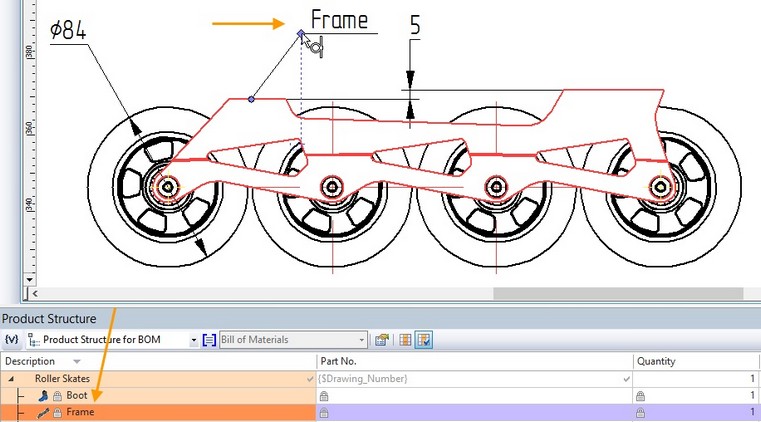
1)You need to select a record in the Product structure window. A callout cursor for the record will appear. Callout is a specific type of leader note element. The corresponding fragment will be highlighted in 2D and in 3D windows. Then you need to specify fixing points of the callout in one of the existing windows.
Position number will be assigned to Text field of inscription/callout Properties window automatically in “{{Position}}” format.
More information about leader notes creation can be found in “Leader Notes” chapter.
2)You need to select an object on the drawing. A callout for the record, which corresponds to the object, will appear. You need to specify its location on the drawing. The Product structure window is not necessary in this case.
Create BOM callout command provides links between records of product structures and callouts. If there were any changes which lead to the position number change, callouts will update.
You can update positions using the following commands:
![]() BRP: Update callouts. This option is used when you change sorting or perform any other action that means positions change in the product structure. The callouts will be updated according to the current values after the option activation.
BRP: Update callouts. This option is used when you change sorting or perform any other action that means positions change in the product structure. The callouts will be updated according to the current values after the option activation.
![]() BRA: Update all. This option updates product structures and callouts. It is used when content of product structure changes, e.g. when new fragments are included into assembly.
BRA: Update all. This option updates product structures and callouts. It is used when content of product structure changes, e.g. when new fragments are included into assembly.
Automatic Callouts Creation
Create All Callouts ![]() command is used for multiple callouts creation.
command is used for multiple callouts creation.
You can select all records using option ![]() . All callouts will appear at once.
. All callouts will appear at once.
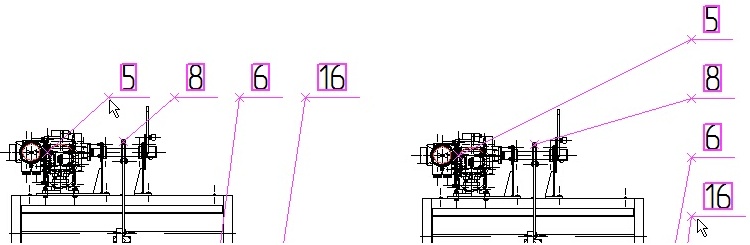
If there are several projections (2D views) created for a product structure item, callouts are created for each of them.
You need to press ![]() icon to finish the selection. The callouts will automatically follow the cursor. The following options will appear in automenu:
icon to finish the selection. The callouts will automatically follow the cursor. The following options will appear in automenu:
|
<Tab> |
Horizontal |
|
<Tab> |
Vertical |
|
<Z> |
Change leader line jog orientation |
|
<D> |
Change placement of additional jogs |
Options ![]() and
and ![]() allow to change direction of the created callouts row – horizontal or vertical.
allow to change direction of the created callouts row – horizontal or vertical.
The ![]() option changes jog orientation for all created callouts.
option changes jog orientation for all created callouts.
When the callouts are assigned automatically, placement of leader note arrows is defined as the middle of the bounding rectangular for each 2D fragment or the middle of the selected projections lines of 3D fragments.
You need to press ![]() to finally set the callouts location.
to finally set the callouts location.
The callouts use standard parameters of leader notes except for arrow ending type (the point is used) and priority (127 is used). If there are several positions corresponding to one fragment, the callout with several jogs is used.
You can change additional jogs placement using ![]() option. Created callouts can be edited.
option. Created callouts can be edited.
Arbitrary data cell of product structure selection
You can output content of an arbitrary product structure cell to the callout. Use the Specify column for linking with callout option for this purpose.

System waits until you select the product structure column after the option activation. The selected column will be highlighted and Use specified column for linking with callout ![]() mode will be activated.
mode will be activated.
The next step is to select string of the product structure. Its content will be set to the callout string.
The selected column is stored. You can disable option ![]() (the column will not be highlighted) and continue callouts creation in an ordinary way. You can enable link with the selected column again, if necessary. The next callout will be linked with the selected cell of the column.
(the column will not be highlighted) and continue callouts creation in an ordinary way. You can enable link with the selected column again, if necessary. The next callout will be linked with the selected cell of the column.
Additional Jogs
Use option ![]() to create several jogs. After the option activation, you need to select all records of the product structure that should be added to the callout.
to create several jogs. After the option activation, you need to select all records of the product structure that should be added to the callout.

You can use existing callouts to show additional positions on the drawing. Therefore, several records may be associated with one callout. For this purpose, point the callout using the mouse cursor, press ![]() and select Edit item from the appeared automenu.
and select Edit item from the appeared automenu.
You need to select the record of the product structure and create a new jog using ![]() button on the Multiple jogs tab in the Properties window.
button on the Multiple jogs tab in the Properties window.
Use ![]() and
and ![]() buttons to change the order of jogs. To delete jogs use
buttons to change the order of jogs. To delete jogs use ![]() button.
button.
To change position on the existing jog, select it and specify any other record in the Product structure window.
Multiple jogs list contains the main leader note jog. Do not delete it.
The symbols “{{ }}” means that the callout is linked to the product structure and is updated in accordance with it. If you remove these symbols, then the link will be broken.
Transparent Call of Create BOM Callout Command
Create BOM callout command is available in the context menu of the selected record.

The command also activates automatically when you drag a record into the scene using Drag’n’Drop mechanism. For this purpose select a record in the product structure, move it and release in the 2D or 3D window. The command of callout creation will be activated.