Editing BOM


Editing BOM |
|
When creating a new BOM, the BOM editing mode activates automatically. To activate this mode for an existing BOM, simply move the pointer to the BOM area and click ![]() (this will work in the case when the transparent text editing setting is activated for the page, by the command "ST: Set Document Parameters" on the View tab). Alternatively, you can call the command "BE: Edit Bill of Materials":
(this will work in the case when the transparent text editing setting is activated for the page, by the command "ST: Set Document Parameters" on the View tab). Alternatively, you can call the command "BE: Edit Bill of Materials":
Keyboard |
Textual Menu |
Icon |
|---|---|---|
<BS> |
Tools > Report/Bill of Materials > Export… |
|
Besides, you can enter BOM editing from the context menu. To do so, move the pointer over the BOM text and right click ![]() . In the coming up menu, select the item "Edit Contents". Any of these efforts lead to entering the BOM editing mode.
. In the coming up menu, select the item "Edit Contents". Any of these efforts lead to entering the BOM editing mode.
On the main toolbar of the T-FLEX CAD (if its state is not locked), the button set “BOM” which has options for editing Bill of Materials will appear.
The automenu options are intended for inserting various elements and formatting the text of the BOM. The text can also be formatted by using the system toolbar. Details of these options and the system toolbar were provided in the description of the command "Text", the sections "Paragraph Text" and "Multipage Text". If after the text formatting it is necessary to restore the formatting defined in the BOM table default template, simply highlight this text and press the option:
![]() Default Format
Default Format
To edit the BOM table template, use the option:
![]() Edit Template
Edit Template
For the system will enter the table creation command. On the main toolbar the button set “Table” will appear with the help of which editing the template (see the chapter "Text").
If the following option is turned on the main toolbar (in the button set “BOM”):
![]() Automatic Update
Automatic Update
Then, the BOM will be updated automatically (updating the table accounts for the specified sorting conditions). This mode is recommended; this is why the icon is turned on by default. If the automatic updating hinders the operation, this icon should be turned off. In this case, the BOM records can be updated manually, using the icon:
![]() Update
Update
Remember, that the sorting conditions are not applied automatically when saving the BOM.
To update the BOM outside the editing mode (as, for instance, after assembling fragments), one can use the context menu. To do this, position the pointer over one of the BOM records and right click ![]() . In the coming up menu, select the item "Update BOM".
. In the coming up menu, select the item "Update BOM".
The Automatic Field option is turned on for all records into the BOM automatically from the inserted fragment data, as indicated by the pushed icon:
![]() Automatic Field
Automatic Field
This means, the manual input is disallowed in the fields of this record. If such a necessity exists, this option can be turned off. Remember however that the later modifications to the assembly do not affect the records created manually.
To manually input a record in the BOM table, first insert an empty row. To add a row to the current group, simply position the pointer at the row, before or after which the record should inserted, and press one of the following icons:
![]() Add Record Before
Add Record Before
![]() Add Record After
Add Record After
As a result, an empty row will be inserted in the current group, allowing for entering a record manually. The position will be defined for the added record. Remember, that upon updating (the automatic update does not work in this case), the added rows will be moved according to the defined sorting parameters (see "BOM Properties").
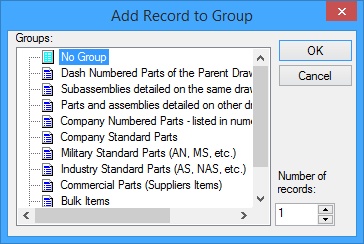
To add a record to an arbitrary BOM group, use the command:
![]() Add Record into Group or Create Group
Add Record into Group or Create Group
In the coming up dialog box select the group to which the record should be added, and enter the number of rows in the parameter "Number of records". Upon confirming, empty rows will be created in the group. This records are also accounted for, when setting the positions. Empty rows appear in the beginning or in the end of the group depending on the sorting rules. If the specified group does not exist in the BOM, then the specified group header will appear in the BOM upon confirmation. This capability can be used when searching for a group in the case of multipage BOMs. |
|
The delete a record, place the pointer over the record entry to be deleted and press the icon:
![]() Delete Record
Delete Record
If all records are deleted in the group, then the group header will also be deleted.
The deleted records still exists in the BOM, they are just not displayed. Those can be viewed using the option:
![]() Show Hidden Records
Show Hidden Records
Upon turning on this option, all deleted records will be displayed in the BOM. The record entry is will be color-marked (the color can be modified in the command "Customize|Options|BOM"). To restore a deleted records, simply select it with the mouse and press the icon:
![]() Restore Hidden Records
Restore Hidden Records
To hide deleted records again, turn off the icon "Show Hidden Records".
The hidden records that were entered manually are kept until the BOM is updated.
A record can be moved up and down by the options:
![]() Move Up
Move Up
![]() Move Down
Move Down
These options are only accessible when the sorting is turned off (see "BOM Properties"), and only for the records that can be a moved without violating the sorting conditions (such as identical records).
If the records should be moved in such a way, that one record always follow the other specific one, it should be tied to the previous using the option:
![]() Snap to Previous Record
Snap to Previous Record
To have a BOM row ignored when setting the positions, one should set the option for it:
![]() Skip Position
Skip Position
To insure that a record has the same position under any assembly or BOM modifications, set the option for this record:
![]() Lock Position
Lock Position
The options:
![]() Insert Empty Row Before Current Record
Insert Empty Row Before Current Record
![]() Insert Empty Row After Current Record
Insert Empty Row After Current Record
Low editing rows, serving as record separators, before or after the record pointed by the mouse. Such rows are assigned the parameter "Automatic Field". No text can be entered in such rows.
The accessed by the following option BOM properties dialog box allows defining the order of setting positions, decoration of the BOM group headers, column properties and sorting conditions (see the section "BOM Properties"):
![]() BOM Properties
BOM Properties
BOM editing is completed using the automenu option:
![]() <F5> Finish input
<F5> Finish input