Creating Macros, Macro Editor


Creating Macros, Macro Editor |
|
A special Macro editor is provided for creating macros.
Macro editor is a macro development environment integrated in T-FLEX, which contains the full set of editing and debugging tools. Writing a macro does not require any application or programming environment. All tools are packed within the Macro editor.
The macro editor can be opened by the command:
Keyboard |
Textual Menu |
Icon |
<WM> |
«Tools|Macro Editor» |
|
The macro editor contains a set of tools that makes development and management of macros easier. The figure below depicts the main tools of the macro editor.
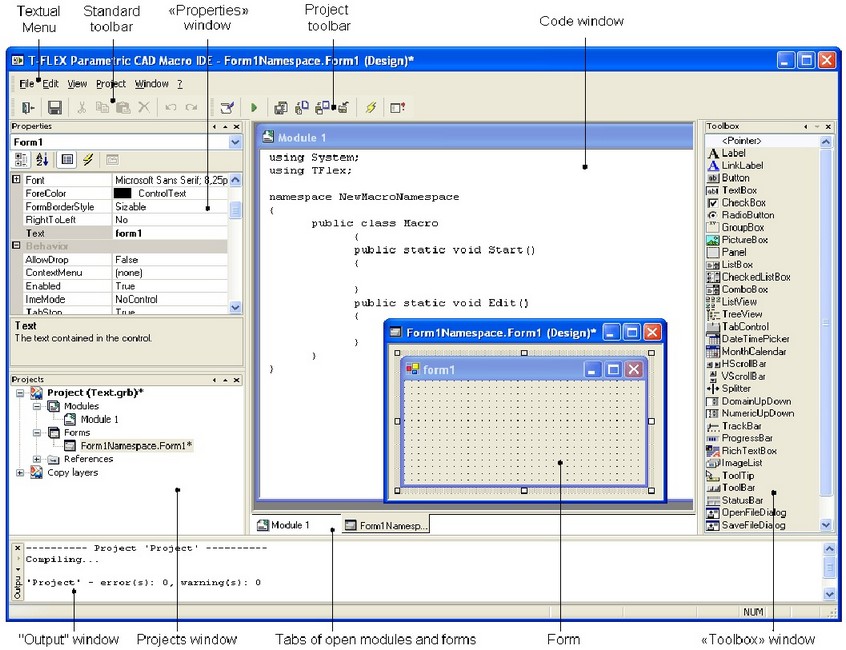
«Projects» window
The window can be accessed via the text menu of the macro editor: View|Projects.
The T-FLEX CAD file appears in the macro editor as a Project. Each Project can include a set of Modules, Forms and References.
A so-called modular programming approach is used when writing macros in T-FLEX CAD environment. Modular programming is the way of structuring a program as a union of small independent blocks, called modules, whose structure and behavior are governed by certain rules. Module is a separately compilable program unit which includes various components (types, constants, variables, namespaces, classes, procedures and functions).
From the program source perspective, a macro is a procedure. Procedure is a part of a program devised for performing a certain specific task.
Form is the dialog box of a macro, within which control elements can be placed (such as text, buttons, text input boxes, radio groups etc.), used for operating the macro. More details on working with this window will be revealed in the topic «Creating macros with screen forms» of this chapter.
References are required for accessing properties, methods and events of a particular object and for using this object while programming a macro. For example, to use T-FLEX CAD commands in a Project, you would need to reference TFlexAPI.dll. At the time of creating a new project, main references are already added to it for using Microsoft Windows and T-FLEX CAD objects.
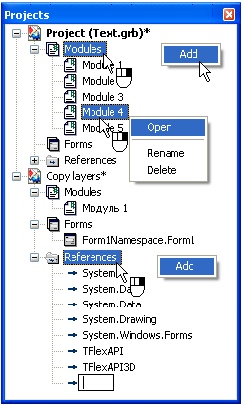 The «Projects» window, just like the «Macros» window, displays all currently opened Projects from T-FLEX CAD files, as well as Projects from the files located in the special folder «/Program/Macros». These two windows are synchronized. Closing a Project (document) file in T-FLEX CAD also makes it close in the «Projects» window of the macro editor. Similarly, a macro that has been created and made executable in the Macro editor consequently appears in the «Macros» window of T-FLEX CAD. Project elements are displayed in this window as a hierarchical structure. Displaying project elements as a tree simplifies viewing and selecting them. The project contains folders with modules, forms and references. There are two alternatives to add a new element to a project: Right clicking
 ![]() the desired folder (for example, «Modules») lets you access the option «Add» in the context menu. After selecting this option, the respective element will be added. When adding a reference, an input box appears for the user to type in the reference. Alternatively, a new module (form, reference) can be created by selecting an appropriate option on the «Project» toolbar.
the desired folder (for example, «Modules») lets you access the option «Add» in the context menu. After selecting this option, the respective element will be added. When adding a reference, an input box appears for the user to type in the reference. Alternatively, a new module (form, reference) can be created by selecting an appropriate option on the «Project» toolbar.
As it was mentioned earlier, each Project can contain an unlimited number of macros (procedures). To tackle the issue of repeating macro names, T-FLEX CAD uses namespaces. A namespace is an area of a program within which a macro (procedure) name must be unique. Use of namespaces helps working with a large number of macros. Namespaces are used as a convenient way of structuring a large number of macros. By using a namespace, one can create two macros with the same names within a common project. In this way, the macros will belong to different namespaces. This approach implies uniqueness of names of namespaces themselves. The names of namespaces should preferably reflect on their purpose as well.
Let's review in details the structure of employing macros in T-FLEX CAD.
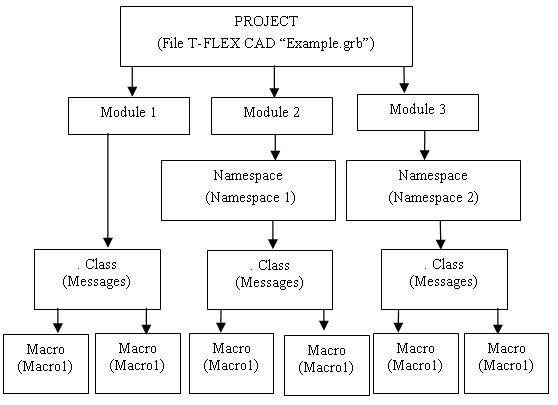
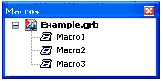
The above scheme illustrates a project from the file «Example.grb». Three modules were created in this project. «Module2» and «Module3» use the namespaces «Namespace1» and «Namespace2», respectively. All three modules use the same class «Messages». Two respective macros are created in each module. In this example, one of the macros in each module use the same name «Macro1». In reality, those are completely different macros, yet having the same names. Such a macros naming structure can be used in the cases when macros serve for similar purposes.
Now, let's review macros representation in T-FLEX CAD environment. More details on handling macro editor windows will be provided below. At this point, let's limit ourselves to reviewing just the structure of macros representation.
As shown on the figure below, a hierarchical structure of nested folders appears upon opening the project «Example», that represent namespaces (the folders with the icon ![]() ) and classes (the folders with the icon
) and classes (the folders with the icon ![]() ), with their respective macros
), with their respective macros ![]() enclosed within.
enclosed within.
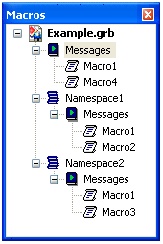

 The namespace approach is not a requirement in any way. However, this approach can be helpful when working with a large number of macros. If, on the contrary, there are few macros in a Project, and those macros all belong to one class, then their appearance in the «Macros» window will be much simpler.
To create a new project, you just need to create a new T-FLEX CAD file. When opened in the macro editor, this project will contain only references. At that time, the user will need to select the programming language, which will be used for writing the macro. For this, use the project properties.
Project properties
To access project properties, you can use the following option of the macro editor:
![]() Project Properties
Project Properties
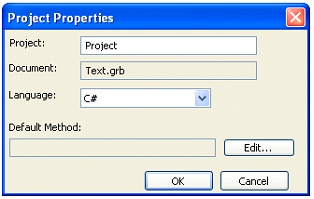
This command can also be accessed from the context menu by right clicking ![]() over the Project in the «Projects» window. After calling this option, a dialog appears with the properties of current project. The Project name is displayed in the «Project» box of the dialog. The field «Document» displays the name of the T-FLEX CAD file that contains the current project. The «Language» combo box provides selection of the programming language, which will be used in the Project. Currently, the polling programming languages are available for selection: Visual Basic, C#.
over the Project in the «Projects» window. After calling this option, a dialog appears with the properties of current project. The Project name is displayed in the «Project» box of the dialog. The field «Document» displays the name of the T-FLEX CAD file that contains the current project. The «Language» combo box provides selection of the programming language, which will be used in the Project. Currently, the polling programming languages are available for selection: Visual Basic, C#.
Upon clicking the button [Edit], a dialog will appear with the list of the current project methods. Working with this dialog is described in the macro launching section.
If modules already exist in the Project, then a warning about those modules becoming outdated will appear upon changing the programming language, offering to delete those.
Module code window
The code window of the created module appears after defining project properties and creating the module in the Macro editor.
The module's code window appears as a text editor. The window displays the automatically created program template with declared references, namespace, class and procedure.
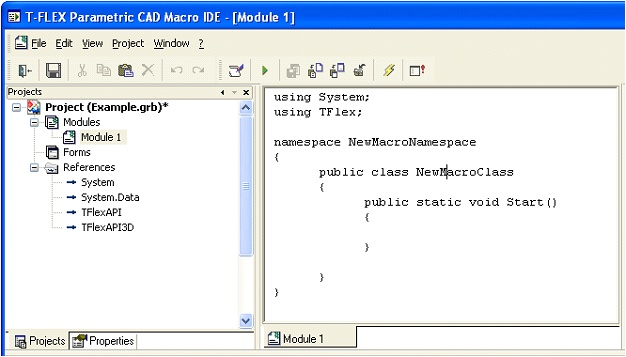
To create a simple macro, you can write just one procedure. Follows below is a macro source code written in the C# programming language. This macro creates a construction entity – circle and a text string snapped to a node and wrapped on the circle.
// Declaring references
using System;
using TFlex;
using TFlex.Model;
using TFlex.Model.Model2D;
// Declaring class
public class NewMacroClass
{
// Declaring procedure (macro name)
public static void CreateText()
{
//Creating document object – the currently active document
Document document = TFlex.Application.ActiveDocument;
// Opening block of document changes
document.BeginChanges("Creating text");
// Creating text object– string text
LineText text = new LineText(document);
// Creating free nodes in the document, with the coordinates (150,100) and (150,140)
FreeNode node1 = new FreeNode(document,150,100);
FreeNode node2 = new FreeNode(document,150,140);
// Creating circle by the center and a point to pass through
CircleConstruction circle = new CircleConstruction(document);
circle.SetCenterAndNode(node1,node2);
// Defining object text parameters
text = new LineText(document);
FontStyle style = text.FontStyle;
style.FontName = "Arial";
style.Bold = true;
style.Italic = true;
text.Color = 1;
text.Node = node2;
text.Circle = circle;
text.TextValue = "Text on circle";
text.HorizontalAlignment = TextHorizontalAlignment.Center;
// Closing block of document changes
document.EndChanges();
}
}
Once the code of the macro is written, you need to compile the project.