Creating Welded Seam


Creating Welded Seam |
|
To create a welded seam, the “WE: Create welded seam” command is used. Invoking this command is carried out by one of the following methods:
Icon |
Ribbon |
|---|---|
|
Assembly → Assembly → Weld → Weld |
Keyboard |
Textual Menu |
<WE> |
Tools > Weld > Weld |
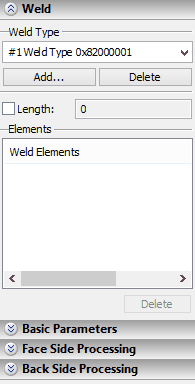
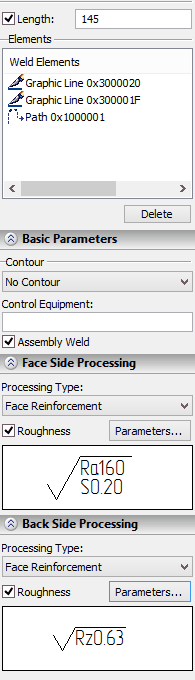
To create a welded seam, after invoking this command it is required to select the welded seam type in the “Welded seam” section of the properties window. In the drop down list those types of welded seams which were defined in the given document will be present. If the required welded seam type is not yet created, it is possible to use the[Add…] button. When pressing this button, the command of creation of the new welded seam type will be started. After completion of the type creation the system will return to the command of welded seam creation. Created seam type will automatically be selected. If not a single welded seam type is defined in the current document at the moment of launching the “WE: Create welded seam” command, the command of welded seam type creation will automatically be invoked. After selection of the type, it is possible to complete the seam creation. 2D welded seam not associated with the drawing’s elements will be created. Its length by default is equal to zero. If necessary, the length of the welded seam can be specified manually. To do so, it is required to enable the “Length” flag and specify the desired length of the welded seam in the input field that appears to the right. |
|
|---|
To link the welded seam being created with the lines of a 2D drawing, it is required to indicate the graphic lines or 2D paths in 2D window with the help of the options of automenu:
|
<I> |
Select graphic lines |
|
<P> |
Select paths |
By default, both of these options are enabled. The elements selected in 2D window are added to the “Elements of welded seam” list. To refuse selection of any element, it is required to select it in the list with the help of By default the length of welded seam associated with the drawing’s elements is determined automatically based on the length of selected lines or paths. If necessary, the length can also be specified manually by enabling the flag “Length”. In the sections “Main parameters”, “Processing front side” and “Processing back side” it is possible to specify individual parameters of the welded seam being created. In the “Main parameters” section the following parameters can be specified: ●Contour: no contour; by closed contour; by open contour; ●Field seam: yes/no; ●Caption of controlling complex or of the seam’s control category. In the “Processing front side” and “Processing back side” sections, the ways of processing the front and back sides of the welded seam are specified. The “Processing type” parameter found in each of these sections allows us to select one of the following types of processing for each side of the welded seam: “No processing”, “Remove reinforcement”, “With smooth transitioning”. To specify roughness of the front or back sides of the welded seam after machining, the “Roughness” flag in the corresponding section of the properties window should be enabled. As a result the[Parameters] button will become available to the right of the given flag. When pressing this button, the roughness’s parameters dialog will open. After specifying the desired parameters and closing the dialog, the image of the given roughness will appear in the preview field located below. |
|
All individual parameters of the welded seam described above can automatically be transferred to the module of technological design “T-FLEX Technology”.
Creating Welded Seam Caption
Caption of the welded seam is created on the drawing with the help of the “WN: Create Weld Symbol” command. Invoking this command is carried out by one of the following methods:
Icon |
Ribbon |
|---|---|
|
Assembly → Assembly → Weld → Weld Symbol |
Keyboard |
Textual Menu |
<WN> |
Tools > Weld > Weld Symbol |
After invoking the command, the automenu and properties window will become available, which are similar to the caption creation command by the structure of elements. In the automenu there is additional option that allows us to select the welded seam on the drawing:
|
<R> |
Select weld |
To select a seam, it is required to move the cursor closer to those lines or 2D paths of the drawing with which the welded seam is associated. When the seam is highlighted, it can be selected by pressing ![]() . On the dynamic image of the note snapped to the cursor the text caption of the selected welded seam will appear. Next this caption is tied to the drawing in the same way as the ordinary note.
. On the dynamic image of the note snapped to the cursor the text caption of the selected welded seam will appear. Next this caption is tied to the drawing in the same way as the ordinary note.
Note that only welded seams that are associated with lines of the drawing can be selected in this way. The welded seams that are not associated with lines of the drawing can be selected only in the “Welded seams” window. Moreover, such a welded seam can be selected with the help of the “Other” item of the context menu if the context menu is invoked in 2D window in the command waiting mode.
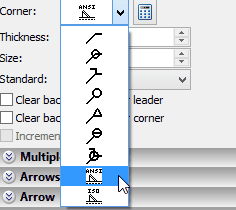
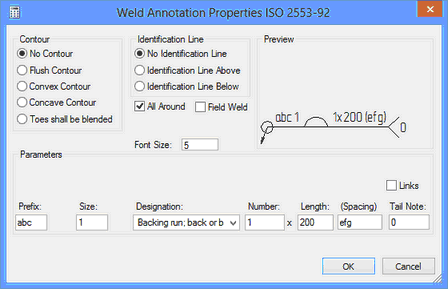
For ISO and ANSI standards the welded seam captions are specified manually. To do so, in the properties window in the «Type» section it is required to select the ISO or ANSI standard from the list.
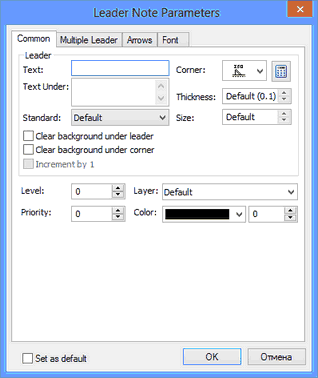
All required parameters of the note are specified in the dialog window «Note’s properties». This dialog window is invoked by pressing the ![]() icon.
icon.
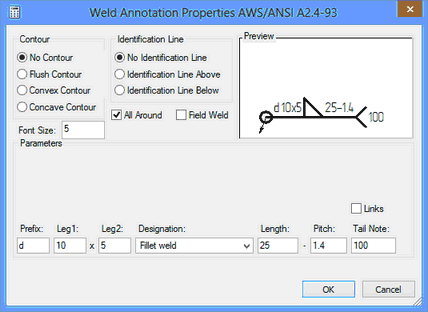
Different dialog windows will appear for the ANSI and ISO standards.
After all input values are confirmed and all necessary parameters for a welded seam are specified, the welded seam caption will be created on the drawing.
The note’s parameters can also be specified in the parameters dialog that is invoked with the following option of the automenu:
|
<P> |
Note’s parameters |
Parameters on the tabs of this dialog duplicate parameters in the properties window.
The note’s parameters dialog can also be invoked in the command waiting mode from the context menu of the note (invoked with ![]() ). Owing to this capability this dialog can be used for immediate change of the note’s parameters without invoking the command of editing.
). Owing to this capability this dialog can be used for immediate change of the note’s parameters without invoking the command of editing.
T-FLEX CAD allows the user to input his own welded seam captions. User’s captions are created in the same way as regular parametric fragments in the library in the folder “System\Welding Symbols”.
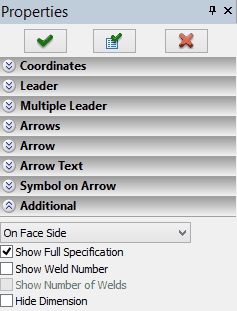
In the command’s properties window there is the “Additional parameters” section that contains the following parameters of the welded seam caption:
Seam’s location. This parameter shows from which side of the seam the caption is positioned: “On Face side” (the seam’s caption will be positioned on the leader of the note) or “On back side” (the seam’s caption will be positioned under the leader of the note).
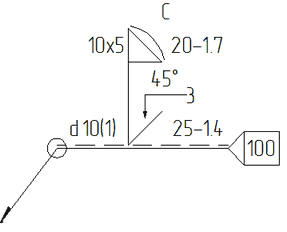
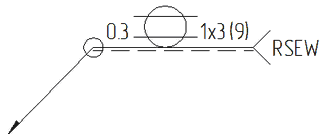
Full caption of a seam. If this flag is enabled, then the full caption of the welded seam is indicated on the caption. When this flag is disabled, the shortened caption that contains the seam type number and individual parameters of the given seam are indicated. By default, for each type of the welded seam the first extension line is created with the full caption, all subsequent ones for the given type of the welded seam – with the shortened caption. Show sequence number. When this flag is enabled, the number of the given welded seam type is shown on the arrow of the note-caption. This parameter is available only when the “Full caption of a seam” flag is enabled. Show number of seams. This parameter is available only when the “Show sequence number” flag is enabled. If it is enabled, before the welded seam type number, which is shown on the note’s arrow, the total number of welded seams of the given type in the current document is specified. Hide dimension. If the given flag is enabled, then the seam’s leg dimension is not shown in the full caption of the welded seam. When the flag is disabled, the full caption with indication of the leg’s dimension is specified. |
|