Helix 3D Path


Helix 3D Path |
|
A helix path is a special type of 3D path that allows you to obtain a conical, cylindrical, flat or parametric screw curve around the selected axis.


Basic Information and Features
Axis of the helix 3D path
The screw curve is built around the axis of the helix. An axis may be defined by any 3D object that can define a 3D path in space (see the “3D path” section) and two 3D points: the start and end.
3D points can be defined by 3D nodes, as well as by any 3D object that can determine a point in space. The vector defining the axis of the helix will be directed from the first point to the second (respectively, the beginning and the end will be determined). The shape of the curve is determined by the parameters of the helix 3D path.

The main parameters of the helix 3D path
The appearance of the resulting helix 3D path resulting from this operation is determined by the following parameters:
●Length may be set by the distance between 3D Points that define the start and the end of the axis, or automatically, when you specify a pitch along the axis. If length is set by 3D points, you should specify only coils in revolutions or degrees, or only pitch along the axis. The system will calculate the missing parameter;
|
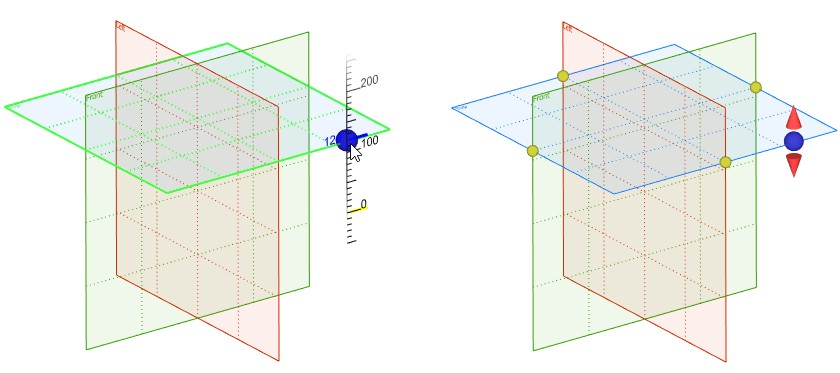
|
The length of the screw curve is determined by the distance between the 3D nodes that define the axis (the screw curve step is specified additionally)
|
The length of the screw curve is determined based on the specified pitch values and the number of turns (n = 4) of the screw curve
|
●Reverse direction of coiling allows to change the direction of a screw curve creation;
●The starting angle ‑ allows you to set the starting angle of the screw curve start point;
●Start, End radius/diameter are the radius/diameter of the screw curve at the beginning and end of the helix 3D path. The initial and final radii/diameter of the cylindrical screw curve are the same;
●Radius/diameter law –allows to specify a graph for a lateral generatrix of a screw curve;
●The law for the z ‑coordinate allows to specify a graph for a screw curve pitch.
Initial Position of Screw Curve of Helix 3D Path
The initial position of the screw curve is chosen arbitrarily by the system. It can be changed by setting the desired position using an additional 3D point - the start point. Additionally, you can specify the numerical value of the rotation angle of the screw curve (from the initial position).

When you specify the starting point of the screw curve, the point will move along the specified initial radius to the plane passing through the selected point and start point of the axis of the helix 3D path.

When simultaneously setting the starting point, the position of the screw curve and the numerical value of the rotation angle, the angle is set according to the position of the screw curve defined by the starting point.
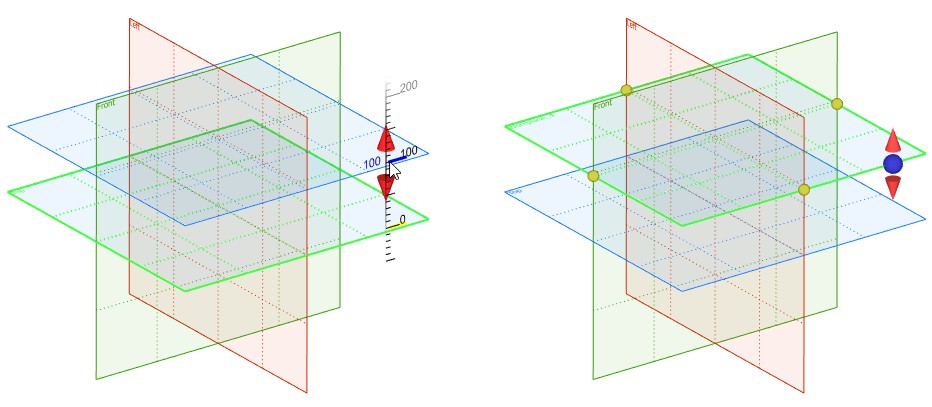
|
|
The start position of the screw curve is set with a numerical value of the rotation angle (30°) without selecting a starting point |
The start position of the screw curve is set using the start point and the numerical value of the angle of rotation (30°) |
Helix Path Creation
To create a helix path, use the command 3PH: Create helix 3D path:
Icon |
Ribbon |
|---|---|
|
3D Model → Construct → Helix 3D path |
Keyboard |
Textual Menu |
<3PH> |
Construct > Helix 3D Path |
To create a helix 3D path, follow these steps:
●Set the axis of the helix 3D path.
●Set the parameters of the helix 3D path (start/end radius/diameter, pitch, radius/diameter law, etc.).
●Select the start point of the helix 3D path position (optional action).
●Confirm the creation of the operation.
Set Axis of Helix 3D Path
The start point of the axis of the helix 3D path is set using the automenu option:
|
<F> |
Select starting Point of axis |
The end point of the axis is selected using the option:
|
<S> |
Select ending Point of axis |
These options are activated sequentially. Selected 3D objects are marked. After selecting the second point in the 3D scene, a screw curve will appear (in accordance with the default values of the helix 3D path parameters).
You can select any 3D object that specifies 3D path in space as a helix path using the automenu option:
|
<G> |
Axis of Helix |
After selecting the axis of the helix 3D path in the 3D scene, a screw curve will be displayed (according to the default values of the helix 3D path parameters).
You can specify screw parameters in the properties window of the command or in the parameters dialog of the operation that is called by ![]() option.
option.
Screw 3D Path Parameters
A screw curve can be created using any combination of input data: Length, Pitch and Coils (in revolutions or degrees). The system checks that the minimum required number of parameters to create a screw curve is set. At list two parameters should be set. The system calculates the third parameter. To set the parameter value manually, you need to set the flag to the left of the parameter name.
If you need to change the direction of the screw curve creation, you need to set the Reverse Direction of Coiling flag.
The radius of the screw curve at its start is set by the Start Radius/Diameter parameter. By default, a cylindrical screw curve is created. If you need to create a conical screw curve, you should select one of the parameters: End Radius/Diameter or Step in the plane, by setting the appropriate flag and setting its value. An alternative parameter is calculated by the system itself.

If it is necessary to set the dependence of the change of the radius/diameter of the screw curve on the number of coils, set the Radius/Diameter law flag. The Start Radius/Diameter and End Radius/Diameter parameters become inactive. If it is necessary to specify the dependence of the pitch change along the axis of the screw curve on the number of coils, you need to set the Z-Coordinate Law flag. In this case, the Length and Pitch parameters become inactive.
To create the required dependencies, you should press ![]() icon to the right. There are two ways:
icon to the right. There are two ways:
●Create new graph – select a name and a type of the graph;
●Use existing graph – select and existing graph.
●Create a new graph - in this case, you should specify a name and select the type of the graph;
●Use existing graph - you should select a graph among the previously created.

Select Start Point of Screw Curve of Helix 3D Path
You can specify the starting point of the screw curve using the following automenu option:
|
<B> |
Select Start Point of Helix |
You can cancel selection of a 3D point by selecting of another point or using the following option:
|
<K> |
Cancel Selection of Start Point |
In this case the screw curve will take the original position. You can set the numerical value of the rotation angle of the screw curve from the start position in the Start Angle parameter in the properties window of the operation. |
|


