Pictures


Pictures |
|
Pictures
You can add to a T-FLEX drawing vector or bitmap images stored in files using different graphic formats – grb (T-FLEX CAD drawing), bmf (T-FLEX Metafile), bmp (Windows Bitmap), wmf (Windows Metafile), emf (Enhanced Windows Metafile), JPEG (Joint Photographic Experts Group), GIF (Graphic Interchange Format), DIB (Device-independent bitmap), and images in the TIFF, PCX and TGA formats.
T-FLEX CAD Metafiles are graphic images of T-FLEX drawings, they do not require parametric regeneration and are quickly displayable on the screen. Those are stored on disk with the extension ".BMF". Metafiles can be generated in the command "EX: Export" or produced by an animation (the command "AN: Animate Model").
Such images can be inserted using various scale, rotated various angles and snapped to nodes, which helps parametrically define their position on the drawing. Unlike fragments, pictures themselves are not parametric, do not use variables or special fixing elements.
Transparent font color can be set for bitmap pictures.
Connection with Source File. Links Mechanism
Pictures, just like fragments and databases, use the links mechanism that allows managing relations of objects with their source files. A picture is related with an object by a "link" that indicates the source of external data.
Recall that the object of a link can be external (external file) or internal (a picture copied from internal file and saved inside the main document, fragment document etc.). Links management is done by the command "AL: Links to other files…".
Links to files are used for 2D and 3D fragments and pictures. The command "File|Assembly|Update links" updates all links to files.
By default an inserted picture uses an "external link" to the source file. By changing the link to embedded in the command “AL: Links to other files…”), you can save the picture directly in the drawing file (without relation to the source file).
Internal document-picture can be generated automatically right after inserting the picture. In this case a created picture will be at once connected with two links: a link to an external document (source file) and to an internal document. Such picture will function as an internal one, keeping the image of the source document in the form that the image had at the moment of insertion, but updating an internal image from the source file in case of need will still be possible.
Pictures on the basis of files “*.grb” are always generated as internal ones with the preserved connection with the source file.
Methods of fixing on drawings
The position of a picture on the drawing can be defined by the following methods:
By two corner fixing points. The graphic image of a picture is bounded by a box. By defining two opposite corners of this box on the drawing, you can change the position and size of the picture's image on a drawing. The original aspect ratio of the picture is not preserved in this way. The picture is fit in the specified box.
The corner points of the picture can be snapped to nodes on the drawing. This will allow parametric control over the position and size of the picture's image. Additionally, one can specify an angle of the picture's rotation about its center.
By one point, rotation angle and scale. In this case, just one reference point is used for fixing. As in the previous method, the fixing point can be related to a node on a drawing.
Creating picture
To insert a picture in a drawing, use the command "IP: Insert Picture":
Icon |
Ribbon |
|---|---|
|
Draw → Title Block → Picture |
Keyboard |
Textual Menu |
<IP> |
Construct > Picture |
After calling this command, the options for creating the picture will appear in the automenu, and the command's properties dialog box — in the properties window.
Choosing source file and fixing method
First of all, it is necessary to choose the source file of the picture being created. This can be done with the help of the button ![]() in the command's properties window or with the help of automenu option:
in the command's properties window or with the help of automenu option:
![]() <M> Select file
<M> Select file
Files can be selected either from the T-FLEX CAD library or just from any folder on the disk.
A picture name can be variable. For this, you shall use a text variable as the picture name.
If the current document (in which the picture is generated) contains internal pictures, the symbol manifesting the existence of the drop down list will appear next to the icon of the option <M>. Another method for selection of the picture source can be picked from the drop down list:
In this case the generated picture will not have the external source file. |
|
||
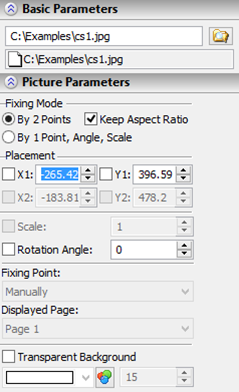
The name of the selected/internal document will be shown in the command's properties window (to the left of the button If the picture is inserted from a library, then the name of the library is entered in the corner brackets, for example, “<Schemes>Graph node”. If the library name in the corner brackets is omitted, the picture is taken from the same library as that in which the drawing is located. Grey (not accessible for editing) field, located a little below is informational and shows the absolute path to the file from which the picture is taken. Upon picture insertion, as a file with bitmap image, a page being inserted from the source document can be selected in the command's properties window (parameter “Displayed Page”). The fixing method for the inserted picture (by two points or by one point, angle and a scale) is selected in the dialog box of the properties window (parameter “Fixing Mode”). |
|
||
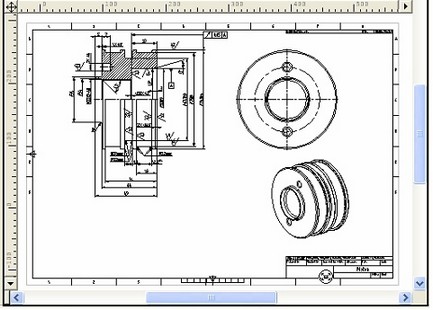
Fixing picture by two points
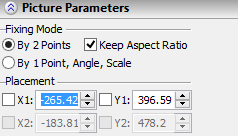
After choosing the fixing method (parameter “Fixing Mode|2 Points” in the command's dialog box) it is necessary to successively indicate location of two fixing points of the generated picture. This can be done with the help of Upon defining fixing points, it is possible to select nodes of the drawing with the help of the option:
|
|
When the second fix point has been defined, the creation of the picture is automatically completed.
After defining location of the first fixing point, it is possible to finish creating the picture by pressing ![]() (in the automenu or in the properties window). In this case, location of the second fixing point will be determined by the system automatically (on the basis of the initial size of the inserted picture).
(in the automenu or in the properties window). In this case, location of the second fixing point will be determined by the system automatically (on the basis of the initial size of the inserted picture).
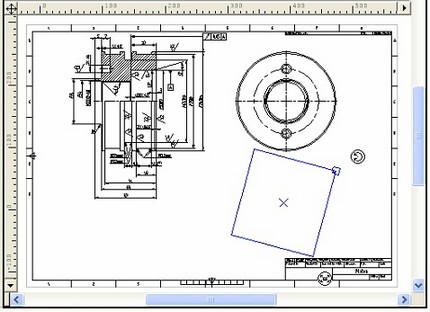
Fixing picture by point, angle and scale
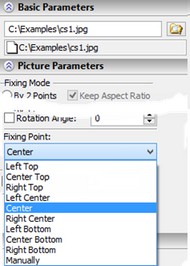
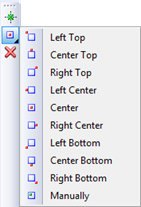
Upon inserting picture by one point, angle and scale, the fixing point is defined first. Note that in the command's properties window location of the fixing point can be selected with respect to the box of the picture (parameter “Fixing Point”). Location of the fixing point can be assigned directly in the drawing's window with the help of “Fixing point ” indicates which one of the characteristic points of the picture rectangle will be combined with the given fixing point. Selection of another characteristic point from the drop-down list of this parameter allows you to change the final location of the image on the drawing. The same can be done with automenu option:
After indicating the fixing point, the picture's contour takes the position in accordance with the parameters (angle of rotation and a scale), prescribed in the command's parameters dialog box (be default, angle of rotation is set to be equal to 0, and scale is 1). At this point it is possible to finish creation the picture by pressing |
|
||||
|
|||||
|
|
||||
Scale and angle of rotation of the picture can be also prescribed in the dialog box of the properties window (parameters “Scale” and “Angle of rotation”).
Creating Internal Picture with Preserved Connection with Source File
To create an internal picture, right upon its insertion it is necessary to turn on the flag “Create Internal Document” under the group “Options” found in the command's properties window. |
|
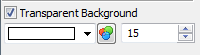
Setting Transparent Color
Prescribing transparent color is possible only for bitmap pictures. Transparent color can be set in two ways: with the help of a special list of colors in the command's properties dialog box (this list becomes available only upon activating the flag “Transparent Background”) or directly in the drawing's window with the help of the following option of the automenu:
|
|
This option lets a user select color directly from the screen by pointing at the desired region of the drawing.
Repeated Picture Insertion
For repeated picture rendering it is convenient to use the following options of the automenu:
![]() <R> Repeat Last Picture Insertion
<R> Repeat Last Picture Insertion
![]() <F> Select Picture to Insert Copy
<F> Select Picture to Insert Copy
The option ![]() enables to repeat multiple insertion of the last picture created in the given document. By default, parameters of the new picture will be assigned the same values as those of the last inserted picture.
enables to repeat multiple insertion of the last picture created in the given document. By default, parameters of the new picture will be assigned the same values as those of the last inserted picture.
The option ![]() enables to repeat insertion of any of the previously inserted pictures many times. After calling this option it is necessary to point at the source picture with the help of
enables to repeat insertion of any of the previously inserted pictures many times. After calling this option it is necessary to point at the source picture with the help of ![]() .
.
Deleting and editing a picture
Picture editing can be done by using option:
|
<F4> |
Execute Edit Picture command |
It completely duplicates the command described below.
Editing pictures
A picture's position and size can be modified, or the picture deleted altogether, in the command "EP: Edit Picture":
Keyboard |
Textual Menu |
Icon |
<EP> |
"Edit|Draw|Picture" |
|
Upon calling the command, the following options become available in the automenu:
![]() <R> Select element from list
<R> Select element from list
![]() <*> Select all elements
<*> Select all elements
![]() <Esc> Exit command
<Esc> Exit command
To select a picture, point to its image and click ![]() . Selection of several pictures can be carried out via a window or with the help of the key combination left <Shift>+
. Selection of several pictures can be carried out via a window or with the help of the key combination left <Shift>+![]() (adding elements to a list of chosen ones) or left <Ctrl>+
(adding elements to a list of chosen ones) or left <Ctrl>+![]() (removing an element from the list). After selecting one or more pictures, the following icons become available:
(removing an element from the list). After selecting one or more pictures, the following icons become available:
![]() <P> Set Picture Parameters
<P> Set Picture Parameters
![]() <Del> Delete selected element(s)
<Del> Delete selected element(s)
![]() <I> Select other element
<I> Select other element
![]() <Esc> Cancel selection
<Esc> Cancel selection
Editing Single Picture
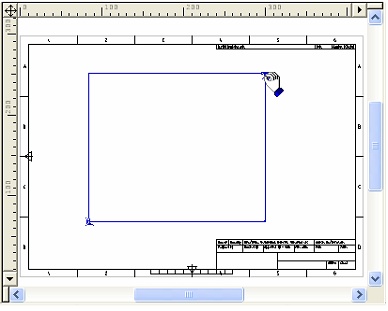
If a single picture is selected, it becomes outlined. The appropriate characteristic points and markers will be highlighted with the outline, depending on the fixing mode.
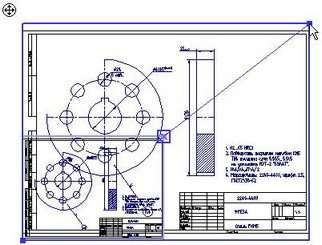
Editing Picture Inserted by Two Fixing Points
If the picture was put on the drawing using two fixing points, then the points defining the picture position on the drawing will be highlighted. By modifying the fixing point positions, you can change the picture location and size. Moreover, at the upper left corner of the picture there will be a picture movement marker, with the help of which a movement of a whole picture can be performed.
To modify the picture size, move the mouse to the desired fixing point and click ![]() . The picture's outline will start rubberband. One of the corners of the outline will be "tied" to the pointer, while the other stay still. Next, move the pointer to the desired position and click
. The picture's outline will start rubberband. One of the corners of the outline will be "tied" to the pointer, while the other stay still. Next, move the pointer to the desired position and click ![]() . After that, the picture will redraw per its new sizes. If the selected fixing point was fixed to a node, this fixing will be broken after the move.
. After that, the picture will redraw per its new sizes. If the selected fixing point was fixed to a node, this fixing will be broken after the move.
Upon movement of the fixing point, the following option will be available in the automenu:
![]() <N> Set Relation with Node
<N> Set Relation with Node
To move the picture with the help of the movement marker, it is necessary to bring the cursor to the pointer, press ![]() , drag the cursor to the desired location and press
, drag the cursor to the desired location and press ![]() again. If the fixing points were initially fixed to nodes, then, upon moving the picture, their relations with those nodes will be broken.
again. If the fixing points were initially fixed to nodes, then, upon moving the picture, their relations with those nodes will be broken.
The picture’s rotation angle can also be defined in the two-fixing-points mode in the properties window.
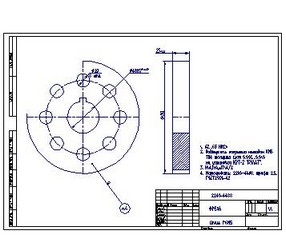
Editing Picture Inserted by One Fixing Point, Angle and Scale
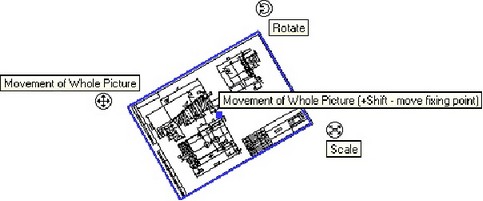
In case when selected picture was put on the drawing with the help of one fixing point, angle and scale, the fixing point as well as the markers for setting picture's movement, scale and angle of rotation will be highlighted. The markers enable to change position, angle of rotation and size of the image directly on the drawing.
The location of the fixing point will be determined by the value of the parameter “Fixing Point” in the command's properties window. If this parameter is modified, another fixing point will be highlighted on the drawing (corresponding to the selected value of the parameter).
Detailed description of working with markers was provided in the chapter "Drawing view. Leader notes".

The exact numerical values of the rotation angle and picture scale can be defined in the picture's parameters dialog box (the option ![]() ). The same dialog allows modifying the picture's fixing method.
). The same dialog allows modifying the picture's fixing method.
If multiple pictures are selected, you can modify their parameters (level, layer, priority). You can also delete the selected pictures from the drawing.
Editing Several Pictures
If multiple pictures are selected, you can modify their parameters (level, layer, priority). You can also delete the selected pictures from the drawing.
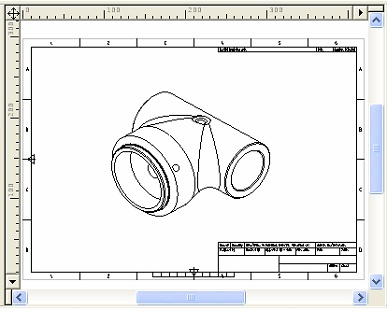
Updating Internal Pictures
If upon creating a picture in the command's dialog box the flag “Create Internal Document” was turned on, then such picture will be connected with two links: the first link will refer to the external source file of the picture, the second one – to, created upon insertion, the internal (i.e. stored inside the current document) copy of the file. Upon recalculations, an internal copy of the source file will be used for updating the picture. This means that picture will preserve the form which the source document had at the moment of creating a picture.
For updating the picture from the external file, it is necessary to select a desired picture in the command waiting mode and call the context menu with the help of ![]() . For the internal picture, which maintained connection with the external source file, the command “Update File Data” will be accessible from the context menu.
. For the internal picture, which maintained connection with the external source file, the command “Update File Data” will be accessible from the context menu.