Drawing Title Block


Drawing Title Block |
|
The drawing title block module is an application that can be launched from the command Customize > |Applications. This application starts by default, as indicated by the availability of the "Title Block" textual menu item. The drawing title block commands are also available in the group “Title block” of the main toolbar.
The toolbar can be opened from the command "SB: Show Toolbars" or selected from the list of toolbars in the context menu accessed by right-clicking ![]() upon pointing the cursor at one of toolbars.
upon pointing the cursor at one of toolbars.
Creating Title Block
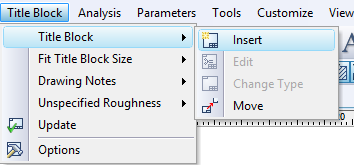
To create a title block, use the command "Insert Title Block":
Icon |
Ribbon |
|---|---|
|
Title Block → Title Block → New |
Keyboard |
Textual Menu |
|
Title Block > Title Block > Insert |
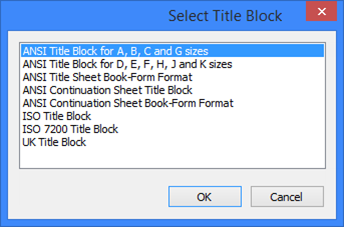
After calling this command, a dialog window appears on the screen, which lists all types of title blocks provided with the system. You can manually add to this list the title blocks of your own design (see the section "Customize").
Select the title block type from the provided list, which you intend to apply to the drawing. After that, a window will appear for filling the title block. This window is a standard window for editing values of fragment external variables and will display by default the dialog created in the title block document using the interface control elements. Upon enabling the "Variables List", flag this window is displayed as the external variables editor.
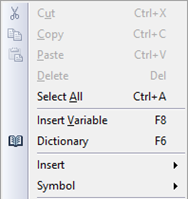
Any field that has the ![]() graphic button next to it can be filled using the list of values. You will be able to create and/or modify the list of values using the context menu commands.
graphic button next to it can be filled using the list of values. You will be able to create and/or modify the list of values using the context menu commands.
When applying the title block, its fields "Drawing Number" and "Title" are automatically bound to the hidden variables of the current document. The same variables define the data for the BOM. Therefore, when inputting data in these fields of the format frame, the corresponding data is automatically entered in the BOM.
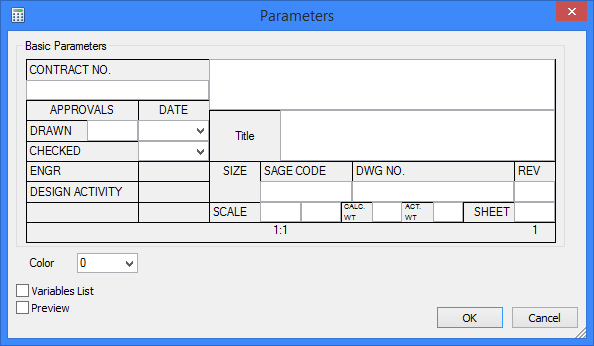
Additional parameter "Color" sets the color of the title block lines and text.
To edit the contents of the title block fields, use the command "Edit Title Block":
Icon |
Ribbon |
|---|---|
|
Title Block → Title Block → Edit |
Keyboard |
Textual Menu |
|
Title Block > Title Block > Edit |
You can reassign the title block type with the command "Change Title Block Type":
Icon |
Ribbon |
|---|---|
|
Title Block → Title Block → Change Type |
Keyboard |
Textual Menu |
|
Title Block > Title Block > Change Type |
To modify the format frame position, use the command "Move Title Block":
Icon |
Ribbon |
|---|---|
|
Title Block → Title Block → Move |
Keyboard |
Textual Menu |
|
Title Block > Title Block > Move |
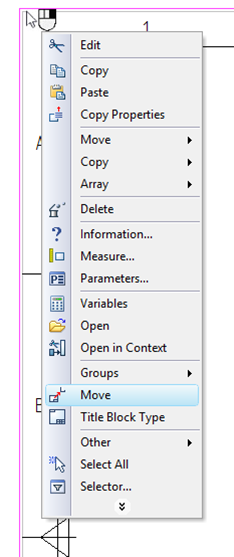
After calling this command, the title block starts rubberbanding on the screen. Point the cursor at the desired point in the 2D window and click You can change the title block type and move the title block by selecting the respective item in the context menu, which appears on right-clicking The title block can also be filled directly in the drawing. To do that, place the text cursor in the title block field, which needs to be filled, and click Since the title block is a drawing fragment, there is another way to apply it - by using the command 'FR: Create Fragment". Please note that, when inserting several title blocks into the current document (for example, for drawings located on different pages), the data from all title blocks will be bound to the same variables of the current document. As a result, the contents of the fields "Drawing Number" and "Title" of all title blocks will be same. As you edit fields in one title block, the text will be changing in all the rest of them. To disable this mode, you need to cancel the established relation with the hidden drawing variables, and then define the new field value. To do this, you need, regardless of the variable editing technique, call the context menu for the respective field. In the menu, clear the check in the "Insert Variable" item. After that, you can edit the text value in the current field. To relate this field with a new variable, call the same command again and define the name of the new variable in the upcoming "Insert Variable" window. |
|
When editing the title block using the dialog for editing fragment external variables, you have another alternative. If you enable the "Variables List" flag in this dialog, then, instead of a dialog with interface control elements you'll see the standard list of the format frame fragment external variables. Find the "$Drawing_Number" and "$TITLE" variables in it (the fields "Drawing number" and "Title"), and replace their values with constants.
In some cases, you may need to suppress automatic binding of title blocks variables with the variables of the current drawing. This may be needed, for example, when frequently creating documents containing several different drawings. In such a case, it is more convenient to edit the title blocks document itself, to have the automatic variable bindings suppressed on inserting it into the current document. To do this, open the format frame document, go into the variables editor and delete the contents of the "Assembly Variable Name" parameter from the above-listed variables.
Title Block Fitting
The commands below serve to define the size of the format of the drawing, and therefore the title block.
Keyboard |
Textual Menu |
Icon |
|
“Title Block > Title Block Size > Standard” |
|
The command picks the format of the closest standard size.
Keyboard |
Textual Menu |
Icon |
|
“Title Block > Title Block Size > By Drawing Limits” |
|
In this case, the format size is determined by the drawing dimensions in the 2D window.
Keyboard |
Textual Menu |
Icon |
|
“Title Block > Title Block Size > By Current Window” |
|
If this command is selected, then the format size will be determined by the dimensions of the current 2D window.
In the latter two cases, the automatically calculated format height and width will be entered in the drawing status (the command "ST: Set Document Parameters"). The format itself will be assigned the "Custom" value.
Drawing Notes
You can enter the mode of creating drawing notes with the command "Insert Drawing Notes":
Icon |
Ribbon |
|---|---|
|
Title Block → Technical Requirements → New |
Keyboard |
Textual Menu |
|
Title Block > Drawing Notes > Insert |
Upon calling this command, a pane is displayed on the screen, in which you can enter the drawing notes. The drawing notes are a paragraph text by default, therefore the automenu provides the same options as those available when working with paragraph text (see the chapter "Text"). It is possible to insert fragments of frequently used text from dictionary, and also use variables and their respective values (the option <F8> – Insert Variable tab). Note that if the "Transparent Text Editing" option is set (the "ST: Set Document Parameters" command, the "View" tab), then you can edit text and variable values by pointing the cursor to the text pane and clicking ![]() .
.
Icon |
Ribbon |
|---|---|
|
Title Block → Technical Requirements → Edit |
Keyboard |
Textual Menu |
|
Title Block > Drawing Notes > Edit |
The "Edit Drawing Notes" command serves to edit the contents of the drawing notes.
Drawing notes location on a page, its format and initial contents are defined by the special hidden “Text” created preliminary in the title block. This Text is named “DrawingNotes” and created the way that its position and size are dependent on the position and size of the title block.
Technical requirements for the document can also be specified without initial reference to a specific drawing. For example, they can be created in the document that contains only a 3D model, and then they can be used on the drawing. Such technical requirements constitute a formatted numbered text which is related to the entire document. For example, it can be specified in the prototype.
For specifying/editing technical requirements of the document the special command is used:
Icon |
Ribbon |
|---|---|
|
Title Block → Technical Requirements → Drawing Notes |
Keyboard |
Textual Menu |
|
Title Block > Drawing Notes > Technical Requirements |
When invoking this command, the text editor window similar to the one used for creation of multi-line and paragraph texts is displayed on the screen.
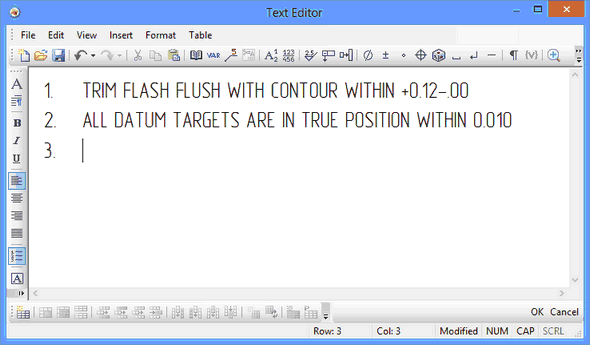
The list of technical requirements specified in this editor is stored inside the document as a multi-line text. If we invoke the “Create technical requirements” command later on, this text will automatically be inserted into the text of technical requirements of this command. Extra lines which are not needed for the given page can be deleted by the user manually.
Technical requirements created with the help of the command “Title Block > Drawing Notes > Technical Requirements…” can also be inserted into the standard text (see the “Texts” chapter).
Unset Roughness Symbol
Icon |
Ribbon |
|---|---|
|
Title Block → Unspecified Roughness → New |
Keyboard |
Textual Menu |
|
Title Block > Unspecified Roughness > Insert |
After calling this command, the roughness parameters window will appear (see the chapter "Roughness Symbols"). Once the parameters are defined, the roughness symbol will appear on the drawing.
Icon |
Ribbon |
|---|---|
|
Title Block → Unspecified Roughness → Edit |
Keyboard |
Textual Menu |
|
Title Block > Unspecified Roughness > Properties |
This command serves to edit roughness properties.
Position of the unspecified roughness symbol is defined by the special hidden “Roughness” element created inside the title block document.
Variations Table
You need to create variations of detail/assembly to fill in a variation table. Variations are created in the FCE: Model configurations and variations command.
More information about the command can be found in “Auxiliary tools for 3D assemblies modeling” chapter.
Use the following command to create a variation table:
Icon |
Ribbon |
|---|---|
|
Title Block → Variations Table → Create |
Keyboard |
Textual Menu |
|
Title Block > Variations Table > Create |
Variations table window appears after calling the command. Model external variables, subtitles and a row of string sequence number that may be used as columns are located in the left part of the window. For this purpose you need to select variable and move it to the right part of the window using Drag’n’Drop.
The variation table window is located to the right. It contains columns that will be used in variation table on the drawing.

You can change the order of columns. Move column header for this purpose. Two red arrows show where your column will be located. The column, moved from the left side of the window using Drag’n’Drop, can be arranged in the same way.

You can change strings sequence. You need to select string and move it to a new position.

Options for the variations table are located on the toolbar in the upper part of the window.
![]() Insert row. The option adds empty string to the end of the list.
Insert row. The option adds empty string to the end of the list.
![]() Update sequence number. The option updates sequence numbers in the “n/n” column. The option is used when strings are moved and sequence is broken.
Update sequence number. The option updates sequence numbers in the “n/n” column. The option is used when strings are moved and sequence is broken.
![]() Reset. The option cancels all changes and returns table to the original state.
Reset. The option cancels all changes and returns table to the original state.
![]() Delete row. Deletes selected string from the list.
Delete row. Deletes selected string from the list.
The table appears on the drawing after pressing [OK] button. You can move it using marker in the upper left corner.

Further, you can manage the created table as a text document.
Use the following command to run a variation table editor:
Icon |
Ribbon |
|---|---|
|
Title Block → Variations Table → Edit |
Keyboard |
Textual Menu |
|
Title Block > Variations Table > Edit |
More information about working with text can be found in “Text” chapter.
You can add a new column or make any other changes in the table using command:
Icon |
Ribbon |
|---|---|
|
Title Block → Variations Table → Change |
Keyboard |
Textual Menu |
|
Title Block > Variations Table > Variations Table… |
After using the command, the Variation table window appears.
All changes in the variation table existing on the drawing will be discarded after pressing [OK] button, and table will be updated. It is recommended to insert all changes in the Variation table window.
Updating Title Block
While working on a drawing, you may need to modify some layout parameters, for example, move the title blocks into a new position. In such a case, the position of the applied drawing notes and unset roughness symbol will remain unchanged. To have such elements positioned according to the new title blocks position, there is the command:
Icon |
Ribbon |
|---|---|
|
Title Block → Options → Update |
Keyboard |
Textual Menu |
|
Title Block > Update |
When this command is called, a window appears, in which you can mark the layout elements that you need to update (Title Block, Drawing Notes, Unset Roughness Symbol).
Parameters
To set up layout parameters, there is the command:
Icon |
Ribbon |
|---|---|
|
Title Block → Options→ Options |
Keyboard |
Textual Menu |
|
Title Block > Options |
After calling this command, a dialog window appears on the screen with two tabs.
"Title Blocks" tab
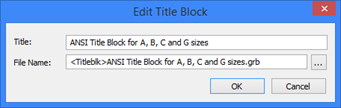
This tab contains the list of title block types used for layouts. You can edit this list using the buttons [Edit], [Add], [Delete]. The first two buttons call the same dialog window, only in the first case it is used for an existing type, and in the second - for a new one.
Title. Specify the title block name in this entry, which will be entered in the list of title block types.
File name. Specify the path to the format frame file in this item entry.
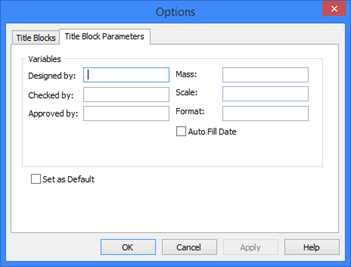
The "Title Block Parameters" tab
Serves to define the parameter values that will be displayed by default when filling in the title block.