Delete Faces


Delete Faces |
|
General concepts
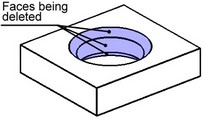
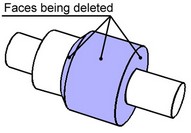
This command allows deleting one or several selected faces. Face deletion breaks solid body topology. The introduced voids invalidate the closed volume. If required, the system can attempt healing those by various means. Otherwise, the result will be a sheet body.
The operation is used in surface and solid modeling, when local changes to the model topology are desired, without affecting the original relations. It can also be helpful when preparing a model to finite element analysis, for such tasks as removal of small model features that are insignificant to the calculations.
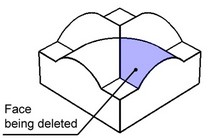
You can directly select the faces to delete by explicitly picking the faces to delete. Alternatively, you can indirectly specify such faces. In this way, you either select a chain of edges surrounding the faces to delete, or a face on which the faces being deleted are dependent.
Using the command
Call the command "3ZD:Delete Faces" via
Icon |
Ribbon |
|---|---|
|
3D Model → Special → Faces → Delete Faces |
Keyboard |
Textual Menu |
<3ZD> |
Operation > Face > Delete Faces |
To execute the command, do the following:
1. Select faces to delete.
2. Select a healing method.
3. Confirm operation creation.
Selecting faces to delete
The option "Select Elements" serves for selecting objects defining the faces to delete:
![]() <F> Select Elements
<F> Select Elements
By default, you can select faces, edges and loops.
In the simplest case, you can select the exact faces to be deleted. However, besides that, there is a convenient option of selecting a closed loop of edges that will define the faces to delete (the selected elements are added to the "Faces" list). This option is not just for speeding up the selection of faces to delete. In a parametric model, if a new face is created as a result of model modifications in the area of faces deletion, this face will be correctly handled by the system.
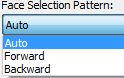
A closed loop of edges divides all body faces into two sets: one to be deleted, and the other to be left out. To determine what particular set of faces will be deleted and what left out, use the option "Face selection by edges". |
|
The default option value is "Auto", for the system to delete the set of faces with the least area. The options "Forward" and "Backward" allow manual selection of the set of faces to delete. The set of faces to be deleted is automatically highlighted in the 3D window. Note that you can select several closed loops of edges simultaneously (intersecting and nested loops are not allowed). This makes possible defining more intricate sets of faces to delete. When selecting a set of edges, the following option is turned on by default:
|
|
If you need to select specific edges, turn off this option.
Selecting healing method
"Healing method" determines the system actions after deleting the selected elements. It instructs whether to close the introduced voids, and, if so, how. Select a method from the pulldown list of the combo box in the property window. The command default method is "Cap".
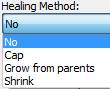
No healing
In this case, the system just deletes the select faces, leaving the resulting void in the model as is. If the original operation was a solid, then the model will lack the closed volume after the deletion, and will become a sheet body.


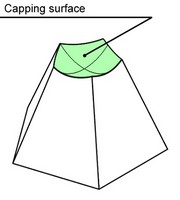
Cap
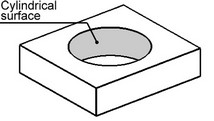
In this way, upon deleting the faces the system tries to form a surface for closing the resulting void. The capping surface must pass through all edges surrounding the void. As a result, this method works in the cases, when all edges surrounding the voids are obtained by an intersection with a single surface. This actually becomes the capping surface.

Grow from parents
In this method, the system tries to close the voids caused by surface deletion by growing the faces adjacent to the deleted faces.

Shrink
In this method, the system tries to close the voids caused by surface deletion not only by growing the faces adjacent to the deleted (as in the previous method), but also by trimming them.
Advanced parameters
Upon selecting the deletion method and the faces to delete, you can specify some advanced parameters.
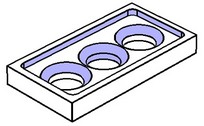
When surfaces are deleted, one or several sets of new loops (of edges) can be created, surrounding the model voids. By default, the system will try to process all those loops simultaneously, as part of processing the model. In the process, the capping surface is being formed that is passing through all loops (that's a ruled surface). However, in some case,s it is necessary to make separate capping surfaces for each loop.
The option "Independent loops" accounts for this.
![]()
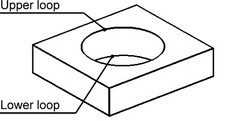
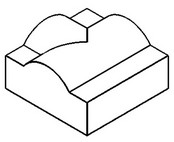
The effect of this option can be demonstrated on the example of a hole with two chamfers. Suppose, the surfaces of the hole and both chamfers are being deleted. In the course of the command, the faces of the hole are deleted, and two loops come into play (the upper and the lower loops), bounding the void introduced in the body.
Original model |
Intermediate stage |
If the option "Independent loops" is turned off, the system unites the two loops in order to close voids, which results in another hole of a larger diameter than the original one. Instead, with the option "Independent loops" turned on, the system processes each loop separately, which in this case results in capping each with a flat surface. The hole completely disappears.
Independent loops Off |
|
When using the "Independent loops" option, a situation can occur when two or more bodies are produced by the operation, instead of one.
Original model |
Independent loops Off |
Independent loops On |
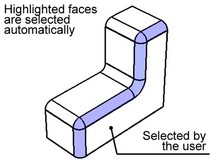
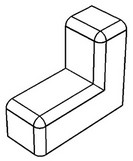
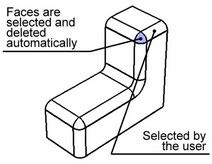
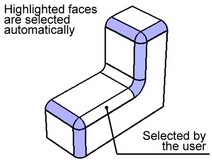
The option "Select blend edges" is provided specifically for the cases of deleting faces created by blending. When deleting blends, one often needs to delete, besides the particular blend face, also some other faces in order to correctly cap the voids introduced in the model.
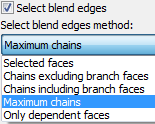
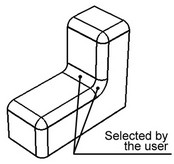
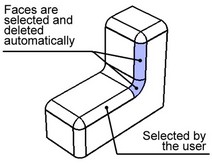
Moreover, sometimes it is necessary to delete all blended faces adjacent to some flat face. Of course, you could select such faces manually; however, more convenient is to select just the flat face. This lets the system automatically select the blend faces to delete. Such automatic selection of faces insures the model parametric behavior through changes in the number of blend faces, maintained by the system.
The option "Select blend edges method" tells the system which faces to select and delete automatically. There are several ways of selecting blend faces.
Selected faces
The system will attempt to delete only the faces that were explicitly selected by the user.
Chains excluding branch faces
A smooth sequence of blend faces will be automatically selected for deletion. The sequence extends up to the faces at which the chain branches into several chains of blend edges (up to branching faces).
Chains including branch faces
A smooth sequence of blend faces is automatically selected, extending up to and including the branching faces.
Maximum chains
A smooth chain of as many blend faces as possible is selected automatically.
Only dependent faces
Only those blend faces are selected automatically that are dependent on the faces selected by the user. The user-selected faces themselves are not deleted.