Printing Several Documents


Printing Several Documents |
|
The “Document printing utility” application can be called by the following T-FLEX CAD command:
Icon |
Ribbon |
|---|---|
|
|
Keyboard |
Textual Menu |
|
File > Print Documents |
To work with the application, make sure that it is running. By default, it is always started. If, however, the application is shut down for some reason (this can be instantly determined by the absence of the command in the textual menu), it can be loaded by the command "AP: External Applications". When the application is running, the list of T-FLEX CAD toolbars contains an additional “Print Control” bar.
The batch of documents will be composed on the basis of the document opened in the active window of the T-FLEX CAD upon invoking the print module. The pages of the base document correspond to the print paper sheets. The images of the documents which need to be printed out are placed on these paper sheets. When carrying out the batch layout for printing, new pages can be automatically added to the base document, and also the settings of already existing pages can be modified. Thus, before calling the print module, it is recommended to create a new blank drafting which will become the basis for compiling the batch of documents.
In the print module, only the pages of the base document having the type “Normal” are displayed and used.
The documents selected as components of the batch are put into the base document as internal pictures with the preserved connection with the source files.
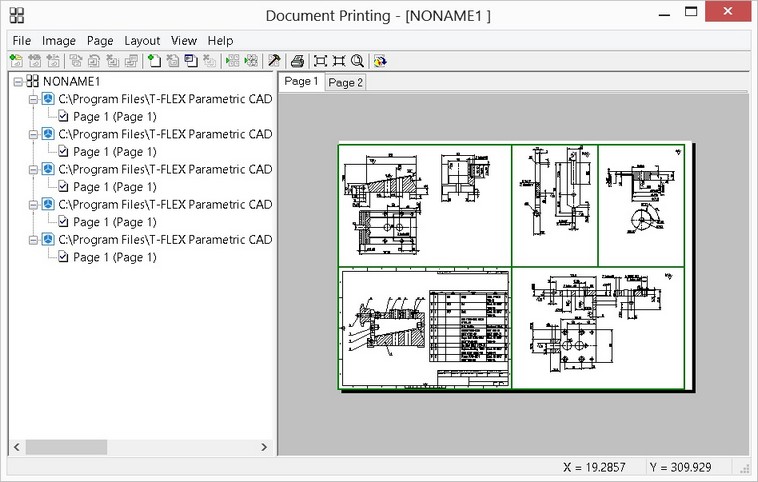
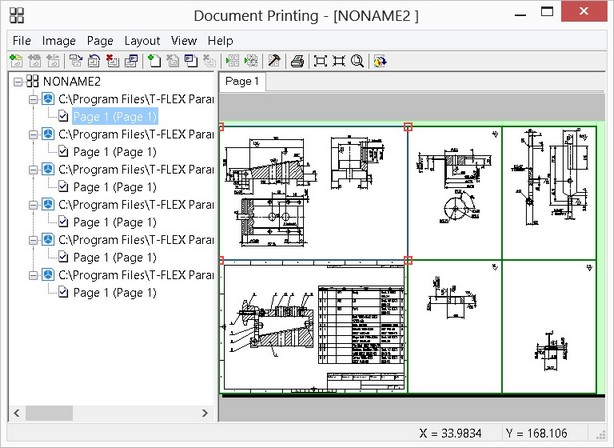
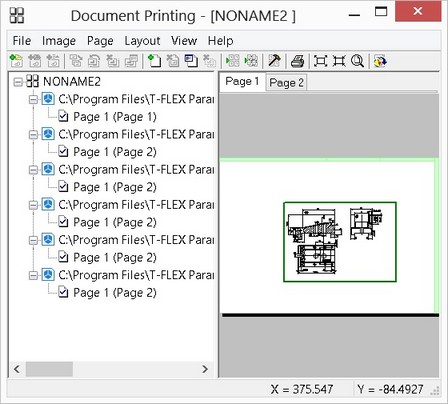
Formation of the batch of documents is carried out in a separate window “Print documents”. This window is split vertically into two panes: the structure of the composed batch of documents is shown on the left, the window with the preview of the composed document is shown on the right.
Formation of the batch for printing is usually performed in the following way: with the help of the commands of the textual menu and toolbar the documents which have to be included into the batch are indicated. A user can select the T-FLEX CAD documents and the documents of all graphics formats available for insertion in the command “IP: Create picture”. For the T-FLEX CAD documents added to the batch and multi-page pictures, it is possible to specify the pages which will be printed.
The images of all documents included into the batch for printing, by default are placed on the current page of the base document. Afterwards, during the batch layout, the images are distributed in a rational way over pages of the base document.
The batch layout (creating new pages, modifying parameters of already existing pages, placing the images over different pages) can be carried out both manually or automatically with the help of the special command.
The compiled batch of documents can be sent to a printer straightway or can be saved as the TFLEX CAD file.
Forming the Structure of Documents Batch
For adding the document to a list, the following commands of the print module are used:
Keyboard |
Textual menu |
Icon |
|---|---|---|
|
«File|Add Image from File…» |
|
|
«File|Add Image from Open Document…» |
|
The command “File|Add Image from File…” allows a user to add arbitrary TFLEX CAD documents to the batch, and also raster and vector images. When this command is invoked, the file selection window appears.
When among the selected documents there is at least one multi-page document, the dialog window “Add Image” is opened additionally. The list of the selected documents together with the specified pages of the given documents as well as the area for the preview of the pages contents are displayed in this window.
By default, in the dialog all pages of the selected documents are marked with the tick (next to the page name). If everything is left unchanged, after pressing [OK], the images of all pages of the selected documents will appear in the preview window of the print module. If for some page the tick is taken off, the image of that page is not put into the compiled batch of documents. To take off the tick, it is enough to point at the desired tick with the cursor and press ![]() .
.

Now the added documents will appear in the batch structure (in the left pane of the print module window). Note that if dimensions of the added image are larger than the dimensions of the current page of the base document, the system can automatically change the scale of the image so that it could fit on the page (the system actions will depend on the settings of the print module).
The command “File|Add Image from Open Document…” allows a user to add to the composed batch the T-FLEX CAD documents opened at the present moment. After invoking this command, the window “Add Image” (analogous to the described above) with the list of the currently open documents and their pages will appear.
Before closing the dialog “Add Image” the system checks if any changes were made in the open TFLEX CAD documents (since the last save).
If the unsaved modifications were found in any of these documents, the system displays the message with the prompt to save the given document. If the user denies saving, the given document can not be added (it will not be shown in the list of the documents in the window “Add Image”).
After compiling the list of the documents of the batch (with the help of any command described above), additional customization of the batch can be carried out by taking off/setting on flags for any image in the batch structure. The images for which the ticks are taken off remain in the batch structure but will no longer be displayed in the preview window of the print module (and as a result will not be printed out). The tick controlling page visibility in the batch can be taken off/set on with the help of ![]() or by using commands «Image|Show» and «Image|Hide»:
or by using commands «Image|Show» and «Image|Hide»:
Keyboard |
Textual menu |
Icon |
|---|---|---|
|
«Image|Hide» |
|
|
«Image|Show» |
|
When forming the structure of the documents batch, the following commands of the print module can be also used:
Keyboard |
Textual menu |
Icon |
|---|---|---|
|
«Image|Dublicate…» |
|
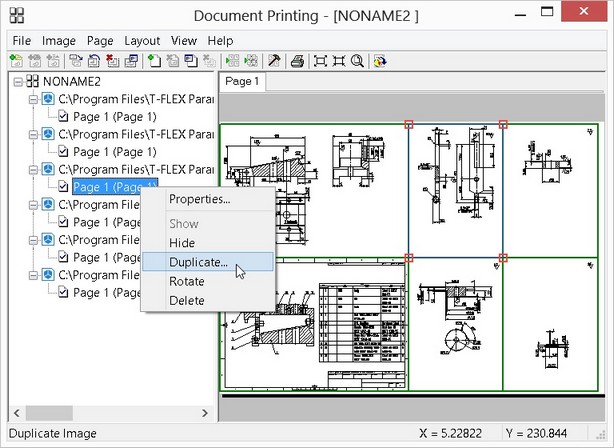
This command allows a user to “duplicate” selected images (from the list of the documents already added to the batch being formed). The images can be selected in the batch structure (in the left pane of the print module window) or directly in the preview window of the print module. The dialog in which the number of the copies being created will have to be specified appears on the screen. Thus, several copies of any image can be printed out.
Keyboard |
Textual menu |
Icon |
|---|---|---|
|
«Image|Rotate» |
|
After invoking this command, the images of the documents selected in the list or in the preview window turn by 90° counterclockwise.
Keyboard |
Textual menu |
Icon |
|---|---|---|
|
«Image|Delete» |
|
This command removes selected images from the list of images of the composed batch.
All commands for dealing with the images of the batch can be also invoked from the context menu of the image.
Keyboard |
Textual menu |
Icon |
|---|---|---|
|
«File|Delete Document» |
|
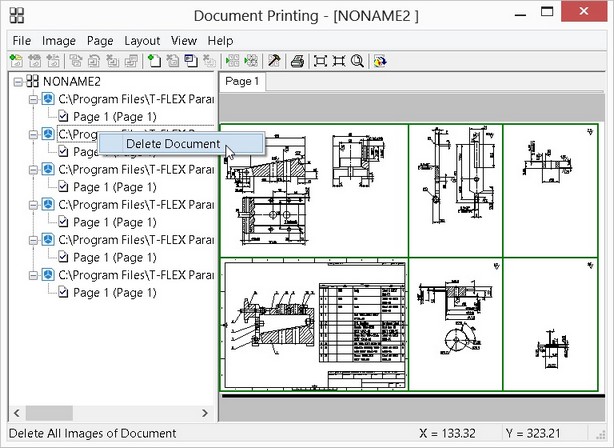
This command allows a user to remove the selected document entirely from the structure of the composed batch. This command can be also called from the context menu for the document.
Keyboard |
Textual menu |
Icon |
|---|---|---|
|
«File|Update Images» |
|
This command allows a user to synchronize the contents of the base document in the main TFLEX CAD window and in the print module.
The document print module works in parallel with the main T-FLEX CAD window. This allows a user to make changes in the base document concurrently in the print module and in the main T-FLEX CAD window. For example, simultaneously with the print module functioning, via the T-FLEX CAD window of the base document a user can modify the page settings, picture parameters or modify the documents on the basis of which the images have been created in the print module. As a result, the situation may arise when the print module lags behind in tracking down these changes. The command “Update Images of Document” is intended to resolve these situations. It removes all data on created images and used documents from the print module, and then restores this data according to the contents of the base document from the T-FLEX CAD window.
Print Module Options
Options of the print module are specified in the command “Set Editor Options”:
Keyboard |
Textual menu |
Icon |
|---|---|---|
|
«View|Options…» |
|
This command invokes the dialog “Options”:
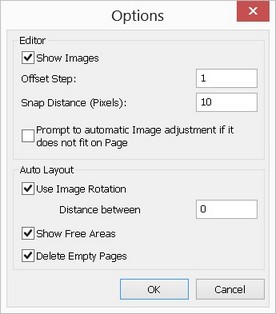
The parameters group “Editor” defines general settings for dealing with the print module: Show Images. This parameter controls the display of the images in the preview area of the print module. When the flag is turned off, only the image bound box is displayed in the preview area. By default, this flag is turned on. Offset Step. This parameter defines the offset step for moving the images selected in the preview area with the help of the keyboard keys (<>, <Ї>, <¬>, <®>). The step size is specified in page units. Snap Distance (Pixels):. This parameter defines the maximum distance in pixels at which the sides of the selected images will be snapped to the sides of other images on page (horizontally and/or vertically). This parameter is taken into account when moving the image with the help of the mouse (recall that the images can be also moved with the help of the keyboard keys (<>, <Ї>, <¬>, <®>). |
|
Prompt to automatic Image adjustment if it does not fit on Page. This parameter defines the system response in cases when the image does not fit on the page of the base document (for example, when adding a large image). When this parameter is turned off, the system automatically moves and scales the images in such a way that they will fit on the page. When the parameter is on, the prompt about the necessity of image translation/scaling will be shown.
The parameters group “Auto Layout” defines layout parameters:
Use Image Rotation. Allows a user to apply rotation to the image by 90 degrees when selecting ways of the image placement.
Distance between Images. This parameter sets the minimum allowable distance between the images after the layout. The distance magnitude is specified in the units of the corresponding page of the source document.
Show Free Areas. If this parameter is turned on, the areas of the base document pages not occupied with the images are marked with green color after performing the layout.
Delete Empty Pages. This parameter affects the work of the mode of layout of all pages in the print module. When this flag is enabled, pages, which after performing the automatic layout, ended up being empty (i.e., not containing any images) are automatically removed. When this flag is turned off, such pages remain in the structure of the print batch (they can be deleted manually afterwards).
Auto Layout of the Documents Batch
For automatic layout of the images within the scope of one page, the following command is used:
Keyboard |
Textual menu |
Icon |
|---|---|---|
|
«Layout|Layout Current Page» |
|
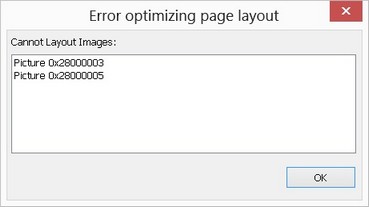
This command distributes images placed on the current page within the scope of this page in such a way that they will not overlap with each other and occupy the least area. In case when the system is not able to place all images on one page, the message “Layout errors” appears with the list of “problem” images.
For automatic layout of all images of the documents batch, the following command is used:
Keyboard |
Textual menu |
Icon |
|---|---|---|
|
«Layout|Layout All Pages» |
|
This command distributes the images of the batch over different pages of the base document. When carrying out the layout, the required number of the base document pages is automatically added. The size of the added pages will be the same as that of the last existing page of the base document. If after successful completion of the layout, the blank pages will still remain in the base document, they can be removed automatically (this operation is performed by setting on the flag “Delete empty pages” in the dialog of the print module options).
The pages are not considered empty if they contain hidden images (images which were added to the batch for printing but for which the flags were taken off later in the batch structure). Such pages can be deleted only after removing hidden images.
If the size of some image exceeds the size of both existing and automatically created pages of the base document, the dialog window “Error optimizing page Layout” will appear on the screen with the list of problem images. The flag “Change Image Size and Run Optimization Again” found at the bottom of the given dialog allows a user to choose further actions of the system. |
|
If this flag is disabled, after pressing [OK] the layout will be completed. The images which could not be placed automatically will have to be placed manually. When this flag is on, after pressing[OK], the dialog for page format selection, similar to that invoked by the command “Page|Page Size…”, will appear. By default, the smallest by area format which accommodates any visible images counting gaps is set in this dialog (see chapter “Print Module Options”). After selecting the format and pressing [OK], the dialog “Page parameters” is closed, parameters of all pages of the base document are automatically modified and the repeated layout is carried out. |
|
“Manual” Layout of Documents Batch
Print module allows a user to enter “manual” corrections into results of automatic layout: change location and size (scale) of images, their distribution over the pages of the batch, etc.
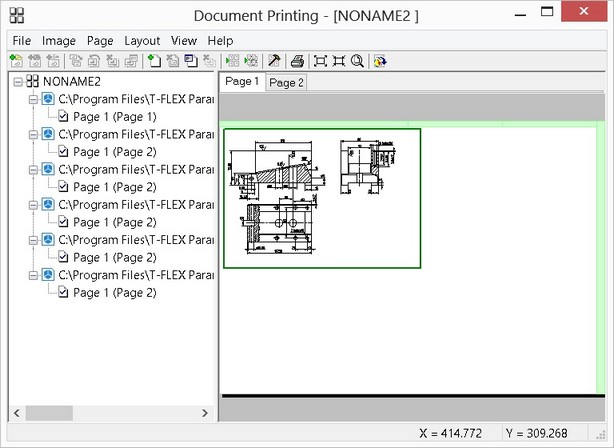
To make the work with the created batch more convenient, the frames of all images in the preview area are marked with a certain color. Nonactive images (i.e., not selected for modification of position and size) are marked with a frame of dark-green (if they fit on the current page) or dark-red (if they do not fit on the current page) color. If the placement of the nonactive image could not be adjusted upon automatic layout, the color of its frame will be dark-red.
Selected (active) image is marked by default with sky-blue color (the color is specified in the command “SO: Set System Options”, tab “Colors”, parameter “2D Elements Highlighting/Additional Color”). In addition, at the corners of the frame of the selected image, square-markers are displayed.
A user can select the image in the list or directly in the preview window with the help of ![]() .
.
When bringing the cursor to the borders of the frame of the selected image or to the markers at the corners, the cursor takes the form of a two-directional arrow (![]() ,
, ![]() or
or ![]() ). If at this moment a user presses
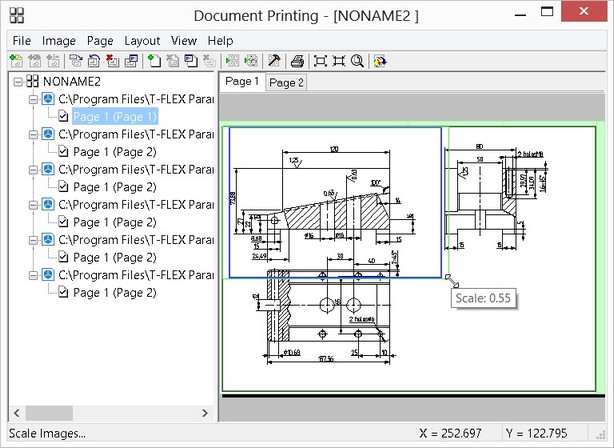
). If at this moment a user presses ![]() and without releasing the pressed mouse button, moves the cursor, the image boundaries will move along with the cursor. After releasing the mouse button, the size of the image bound box will be modified (thus, the scale of the image view will be modified). The same result can be achieved if after the first click on
and without releasing the pressed mouse button, moves the cursor, the image boundaries will move along with the cursor. After releasing the mouse button, the size of the image bound box will be modified (thus, the scale of the image view will be modified). The same result can be achieved if after the first click on ![]() , a user releases the mouse button straightway, moves the cursor to the desired place (corresponding to the desired location of the image bound box) and presses the
, a user releases the mouse button straightway, moves the cursor to the desired place (corresponding to the desired location of the image bound box) and presses the ![]() again.
again.
When moving the cursor, the scale magnitude is rounded off up to the second digit after the comma. A user can refuse to round off the scale by keeping the key <Ctrl> pressed while moving the borders of the image bound box.
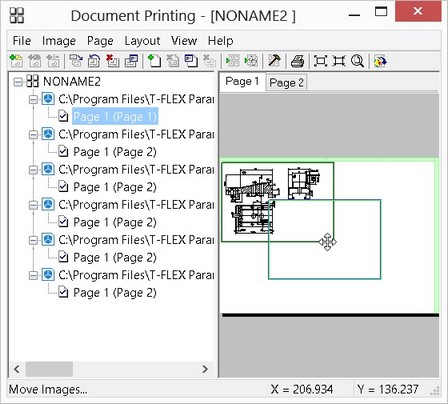
In order to move the image over the page, after the image selection put the cursor in any place inside the image bound box. The cursor will take the following form: ![]() . Press
. Press ![]() and without releasing the mouse button, move the cursor to the required place on the page. Also, another way of working with the dragger can be used here – if after pressing
and without releasing the mouse button, move the cursor to the required place on the page. Also, another way of working with the dragger can be used here – if after pressing ![]() , the mouse button is released, the image bound box will start to follow the cursor motion. Second click on
, the mouse button is released, the image bound box will start to follow the cursor motion. Second click on ![]() will fix the image in a new place.
will fix the image in a new place.
When moving the image with the help of the mouse, the snapping of the selected image to the sides of other images on the current page of the document is performed (taking into account the value of the parameter “Editor/Snap Distance (Pixels)” in the options dialog of the document print module).
It is also possible to move the image with the help of the keyboard keys <>, <Ї>, <¬>, <®>.
Selected image can be also moved to another page of the base document. To do it, point with the mouse inside the image bound box, press ![]() and without releasing the pressed mouse bring the cursor to the tab of the desired page. The selected page will be automatically opened in the preview area. After that, it will remain only to place the image on that page and release the mouse button. If after the image selection, a user presses
and without releasing the pressed mouse bring the cursor to the tab of the desired page. The selected page will be automatically opened in the preview area. After that, it will remain only to place the image on that page and release the mouse button. If after the image selection, a user presses ![]() and immediately releases the mouse button, the translation will be completed after the second click of the
and immediately releases the mouse button, the translation will be completed after the second click of the ![]() (already on the selected page of the batch).
(already on the selected page of the batch).
The scale, the placement page and the location of the selected image within that page can be also modified with the help of the command “Edit Image Properties…”:
Keyboard |
Textual menu |
Icon |
|---|---|---|
|
«Image|Properties…» |
|
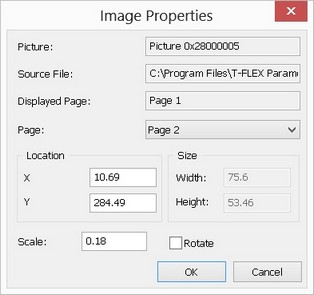
Upon invoking this command, the dialog window “Image properties” with the parameters of the selected image is opened:
Picture. This field carries picture ID in the base document of the batch. Source File. Path of the source file with the given image Displayed Page. This parameter indicates the page in the source document used for creating the given image. Page. This parameters shows the page of the base document on which the current image will be placed. The drop down list allows a user to select another page of the base document for placing the image. Location. Parameters of this group define the image location within the page of the base document. Size. This is the parameters group showing the real dimensions of the given image (taking into account the specified scale). |
|
Scale. Scale of the view of the current image on page of the base document.
Rotate. When this flag is enabled, the image is turned by 90° (with respect to the initial position). This parameter is enabled automatically if the image was rotated upon the auto layout.
For modifying scale and position of several images on one page at once, multiple selection can be used. For example, you can use selection with window (in the preview area) or successive selection with the help of <Shift>+![]() (<Ctrl>+
(<Ctrl>+![]() cancels your selection of the image). Note that multiple selection can be used only for images placed on one page of the base document.
cancels your selection of the image). Note that multiple selection can be used only for images placed on one page of the base document.
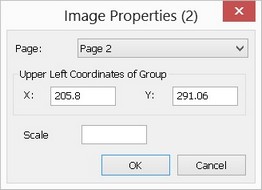
Selected images are marked with common frame. Modification of size (scale) and location of a group of images is carried out the same as when dealing with one selected image. In this dialog, the scale field will be left empty if selected images have different scales. If the scale magnitude is specified, then after pressing [OK] and closing the dialog, the specified value will be set for all selected images. If the field is left empty, the scale of the elements will not be changed. |
|
Invoking the command “Edit Image Properties…” when selecting several images at once makes the dialog window “Image properties” appear. In the title of this window it is shown to how many images the settings of this dialog will be applied.
Change of Parameters for Pages of Base Document. Adding/Deleting Pages
To modify parameters of any page of the base document, the command “Change Page Properties” found in the print module is used:
Keyboard |
Textual menu |
Icon |
|---|---|---|
|
«Page|Page Size…» |
|
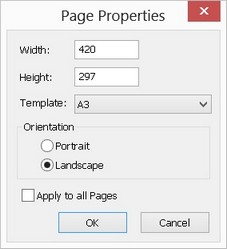
Upon invoking this command, the dialog “Page Properties” is opened. With the help of this dialog, you can modify the format (by selecting it from the list of the standard formats or by specifying desired width and height) or orientation of the current page of the base document. The flag “Apply to all pages” allows a user to apply specified settings of the given dialog to all pages of the base document at once.
If needed, a user can add a page to the base document manually. To do it, the command “Add new Page” is used: |
|
|---|
Keyboard |
Textual menu |
Icon |
|---|---|---|
|
«Page|Add» |
|
A user can delete the current page of the base document (under condition that it does not contain any images), with the help of the command “Delete Current Page”:
Keyboard |
Textual menu |
Icon |
|---|---|---|
|
«Page|Delete Current Page» |
|
Note that if on the apparently empty page there are hidden images (i.e., the images for which the flag next to the name has been taken off in the batch structure), then the removal of such image will be impossible. In this case the command “Delete All Hidden Images” can be used:
Keyboard |
Textual menu |
Icon |
|---|---|---|
|
«Page|Delete Hidden Images» |
|
This command removes from the document structure unused images located on the current page of the base document. After executing this command, the current page can be deleted.
Printing Composed Batch of Documents
A user can print out the composed batch of documents directly from the print module with the help of the following command:
Keyboard |
Textual menu |
Icon |
|---|---|---|
|
«File|Print…» |
|
This command in turn invokes the command “PT: Print Model”.
The composed batch of documents can be also sent to a printer from the main T-FLEX CAD window by calling the command “PT: Print Model” for the base batch of documents.