How I have designed a space shuttle using T-FLEX CAD
Author: Alexander Makarov, Top Systems Ltd. Implementation Department Lead Specialist
The main idea was to demonstrate an effective usage of various T-FLEX CAD tools in designing an unmanned reusable spacecraft capable of delivering payload to low-earth orbit. Let’s not dive deeply into engineering calculations and just say, that the spacecraft was supposed to be approximately twice smaller that the Space Shuttle and Buran (total length 13 660 mm), but larger that old projects like MiG-105 and X-20 Dyna-Soar and new projects like Kliper, Dream Chaser and Boeing X-37. Rather, in terms of dimensions, it is close to the orbital aircraft of the cancelled European Hermes project without the so-called resource module. The payload was supposed to be deployed similar to the Space Shuttle: through the cargo bay doors using manipulator. The absence of crew would allow to increase the volume of the cargo bay and reduce the weight due to the lack of life support systems.
The launch was planned to be carried out as a stage of a traditional vertical take-off rocket, or with the help of a supersonic booster aircraft. The latter, exotic method would be even more interesting from the point of view of engineering design.
Initially, many sketches were made in search for the final appearance and overall design of both the spacecraft itself and its carrier (Fig. 1).
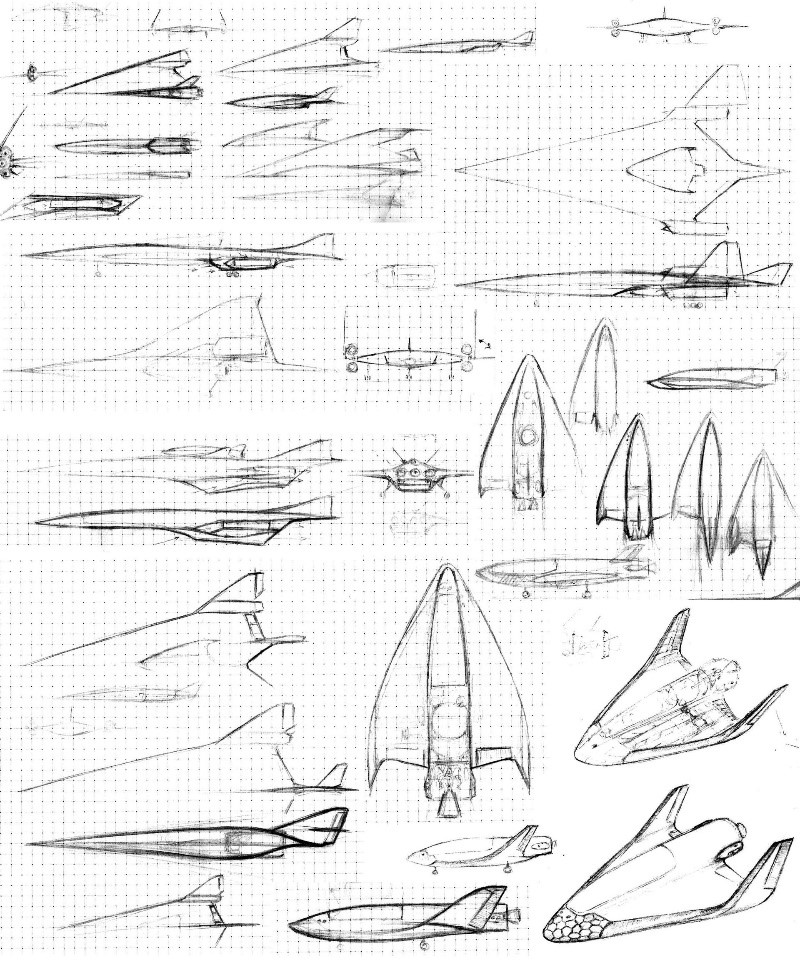
Fig. 1. Snippet of some of the initial hand-drawn sketches
The model was supposed to be fully dependent on the reference geometry. The layout file was created containing the geometry that defines the appearance of the spacecraft - most of the elements of the frame and skin refer to it. Airfoils were constructed as 3D profiles, using the new spline creation mechanics (Fig. 2), smoothness was adjusted, boundary conditions were specified (Fig. 3). However, the basic T-FLEX CAD construction lines creation mechanism was the main tool for defining linear geometry and forming dimensional chains.
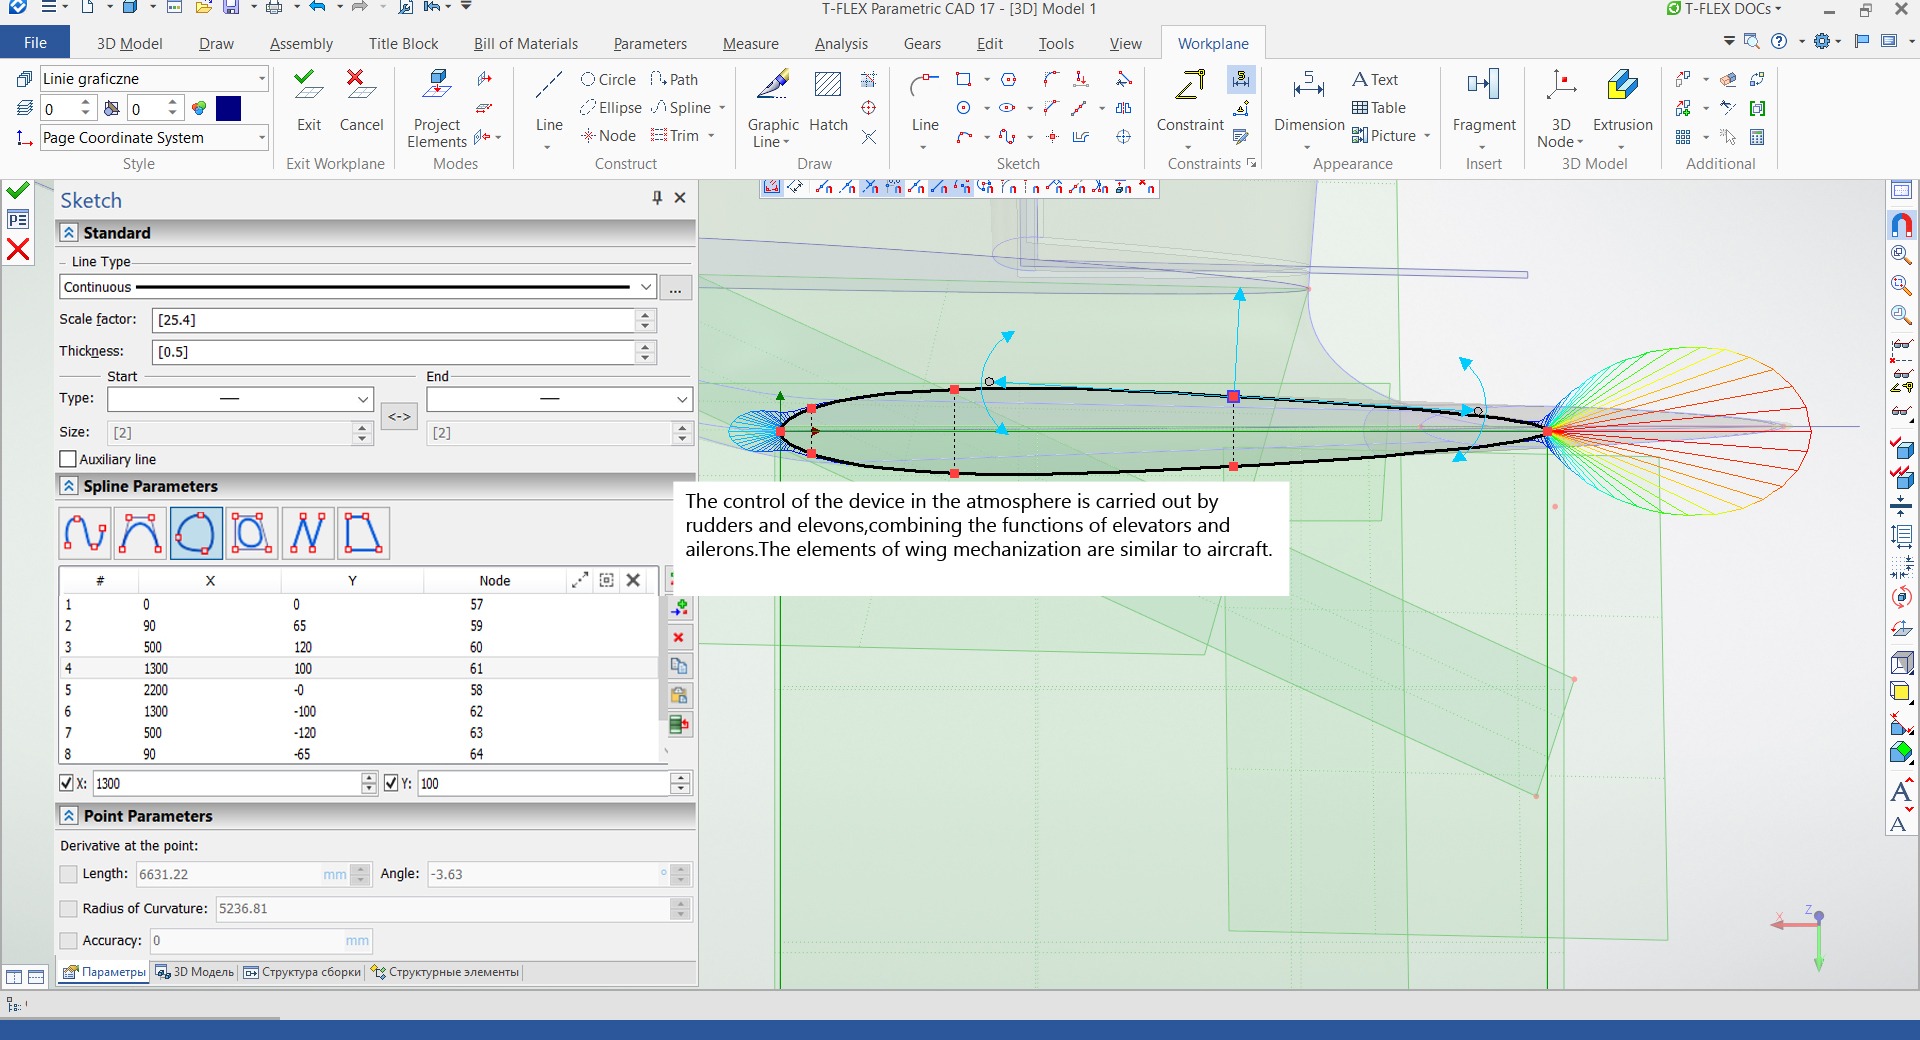
Fig. 2. Constructing airfoil using splines
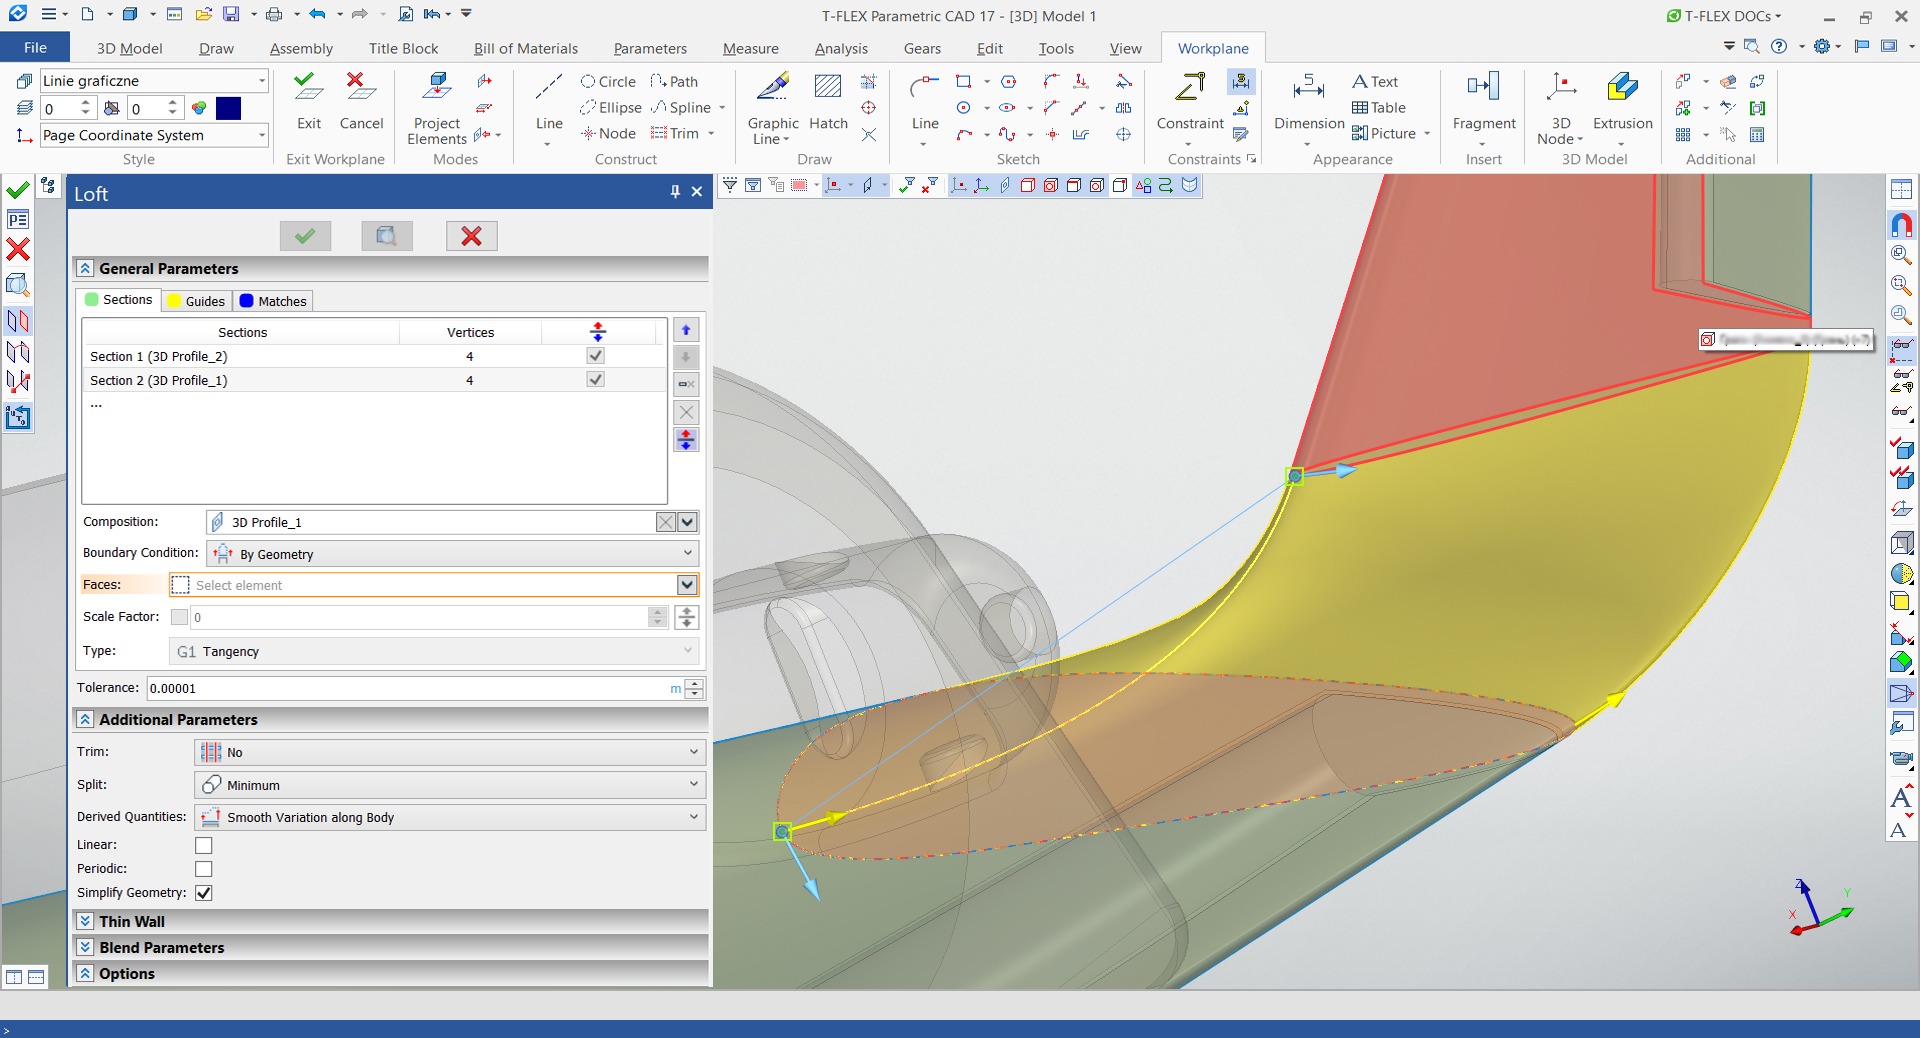
Fig. 3. Boundary condition of Loft
Most of the surface creation commands were used. However, the main shape-creation tool was the Loft. Fin tips were made using the Transition Surface (Fig. 4).
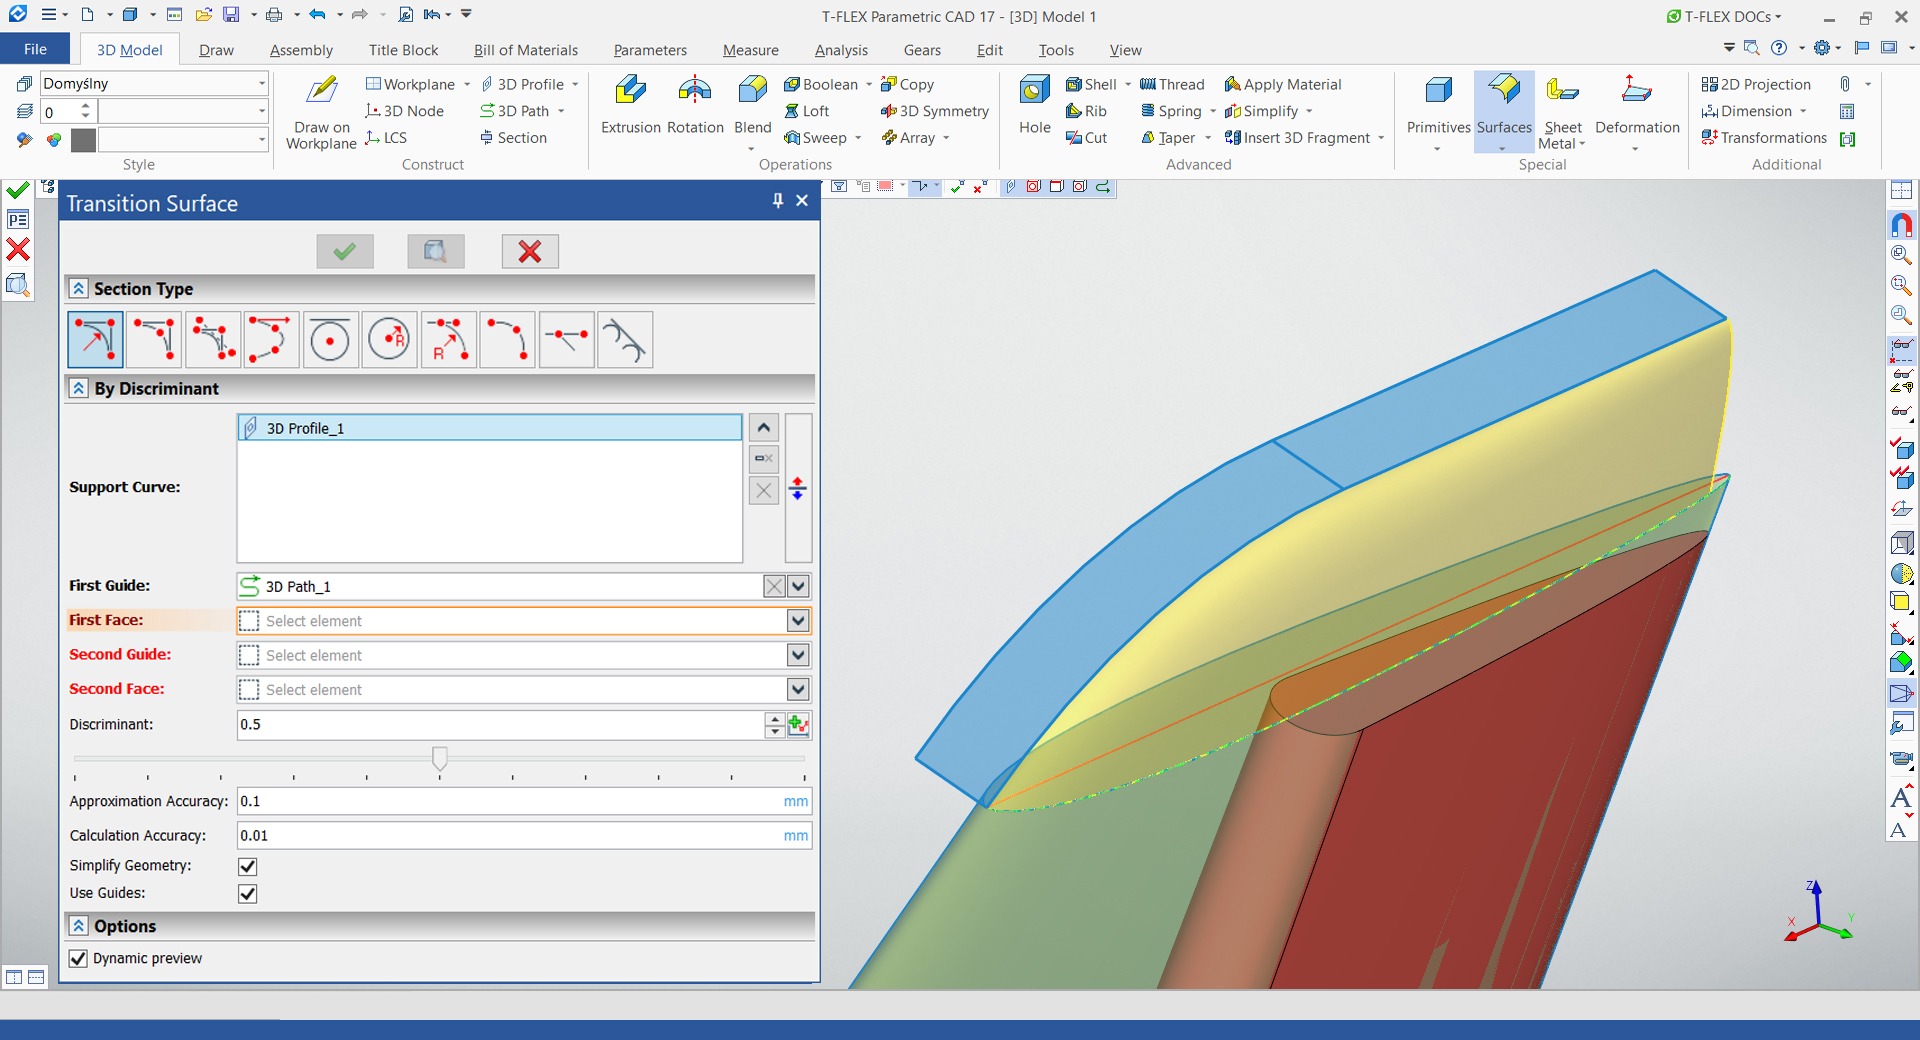
Fig. 4. Constructing the fin tip
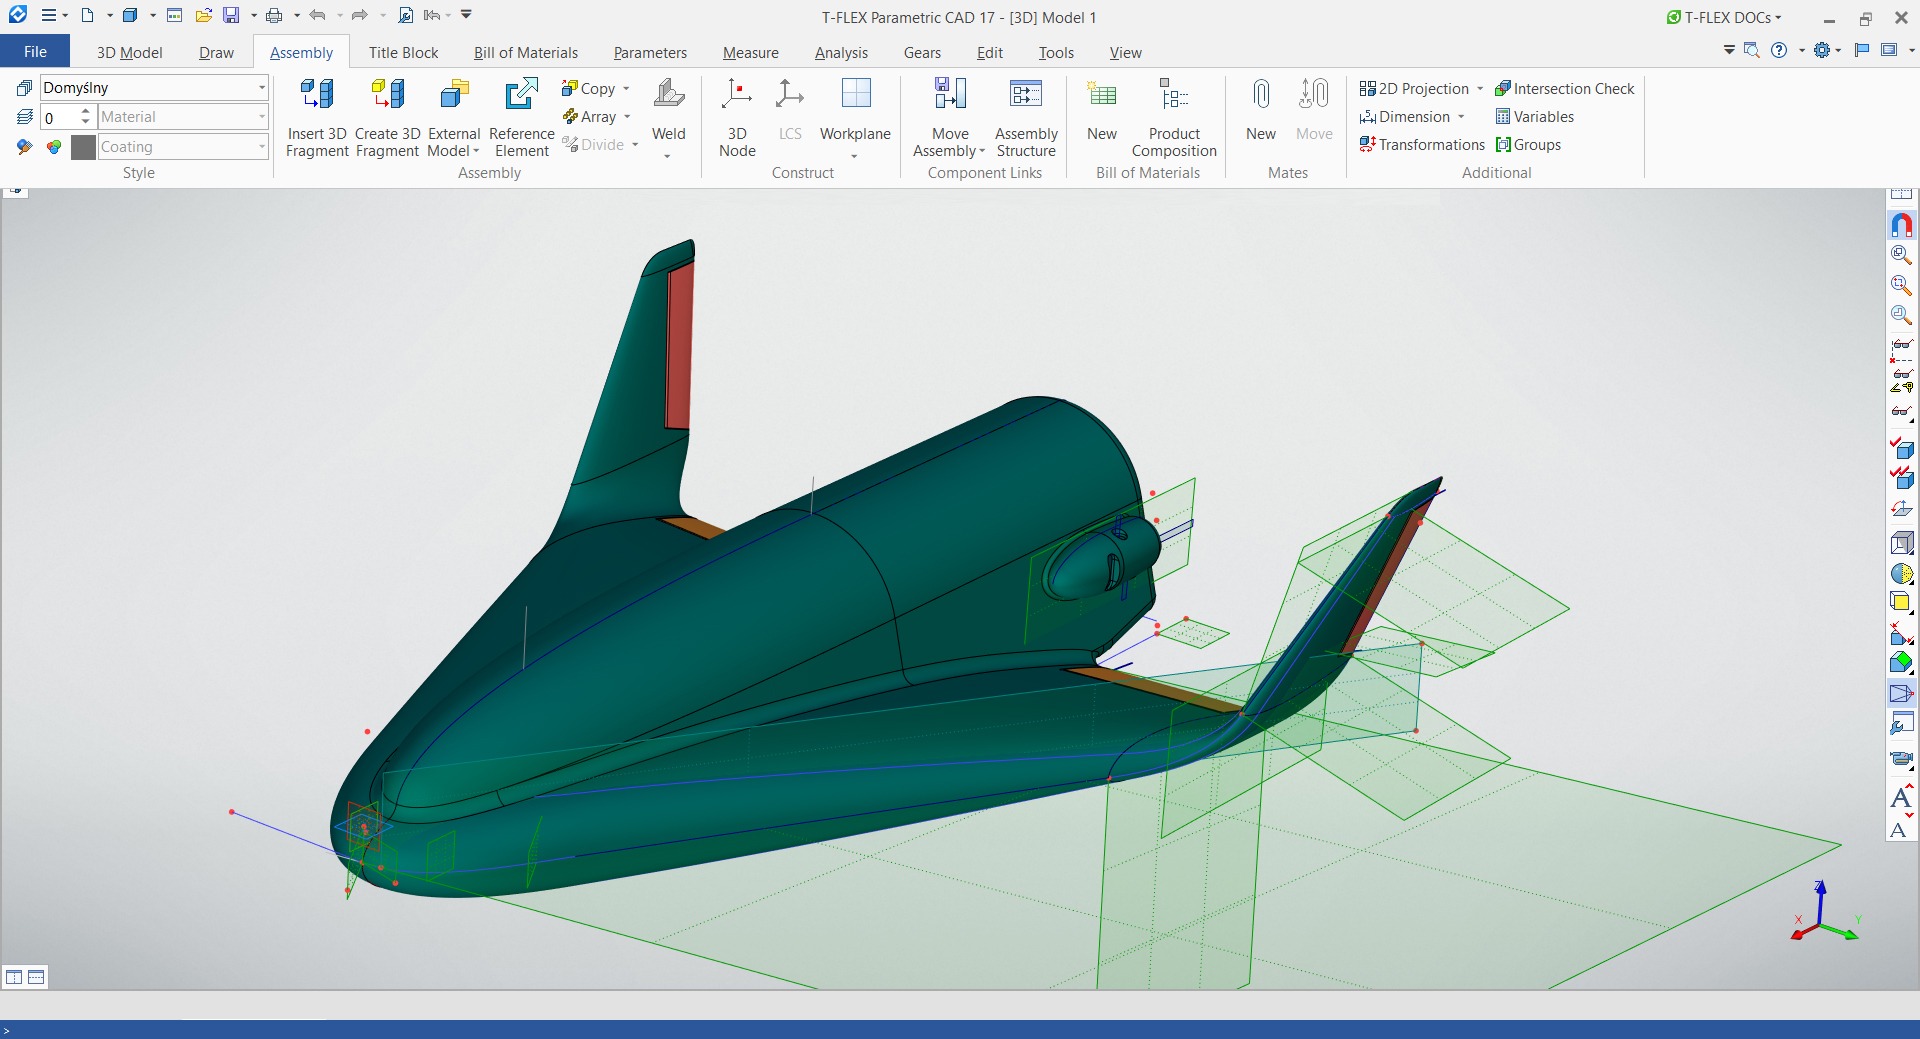
Fig. 5. Layout model with the set of workplanes
The airframe consists of frames, spars and stringers. All of them refer to base surfaces in the layout file. For convenience, colors of airframe elements in the shading view style indicate their materials: light blue – aluminum, blue – titanium, dark blue – steel, green – carbon-fiber composite, etc. Later certain colors were assigned to particular units and mechanisms, pipelines, wiring, heat protection.
Paths for fastening holes were marked along the elements of the airframe using the equidistant 3D paths creation tools. Of course, mutual dependencies of the airframe elements are thought out in advance in order to avoid recursion. The holes themselves are drilled by array of 3D nodes located on paths with a certain step.
Ribs are compound, consisting of upper and lower capstrips connected via composite rods bearing tensile and compressive loads. Each capstrip was created as a section of a wing between bounding workplanes and extruded cutout, so in order to obtain a next capstrip, it’s enough to just move the base plane by the frame spacing and them adjust positions of holes in accordance with rods length (Fig. 6). It significantly reduced the working time.
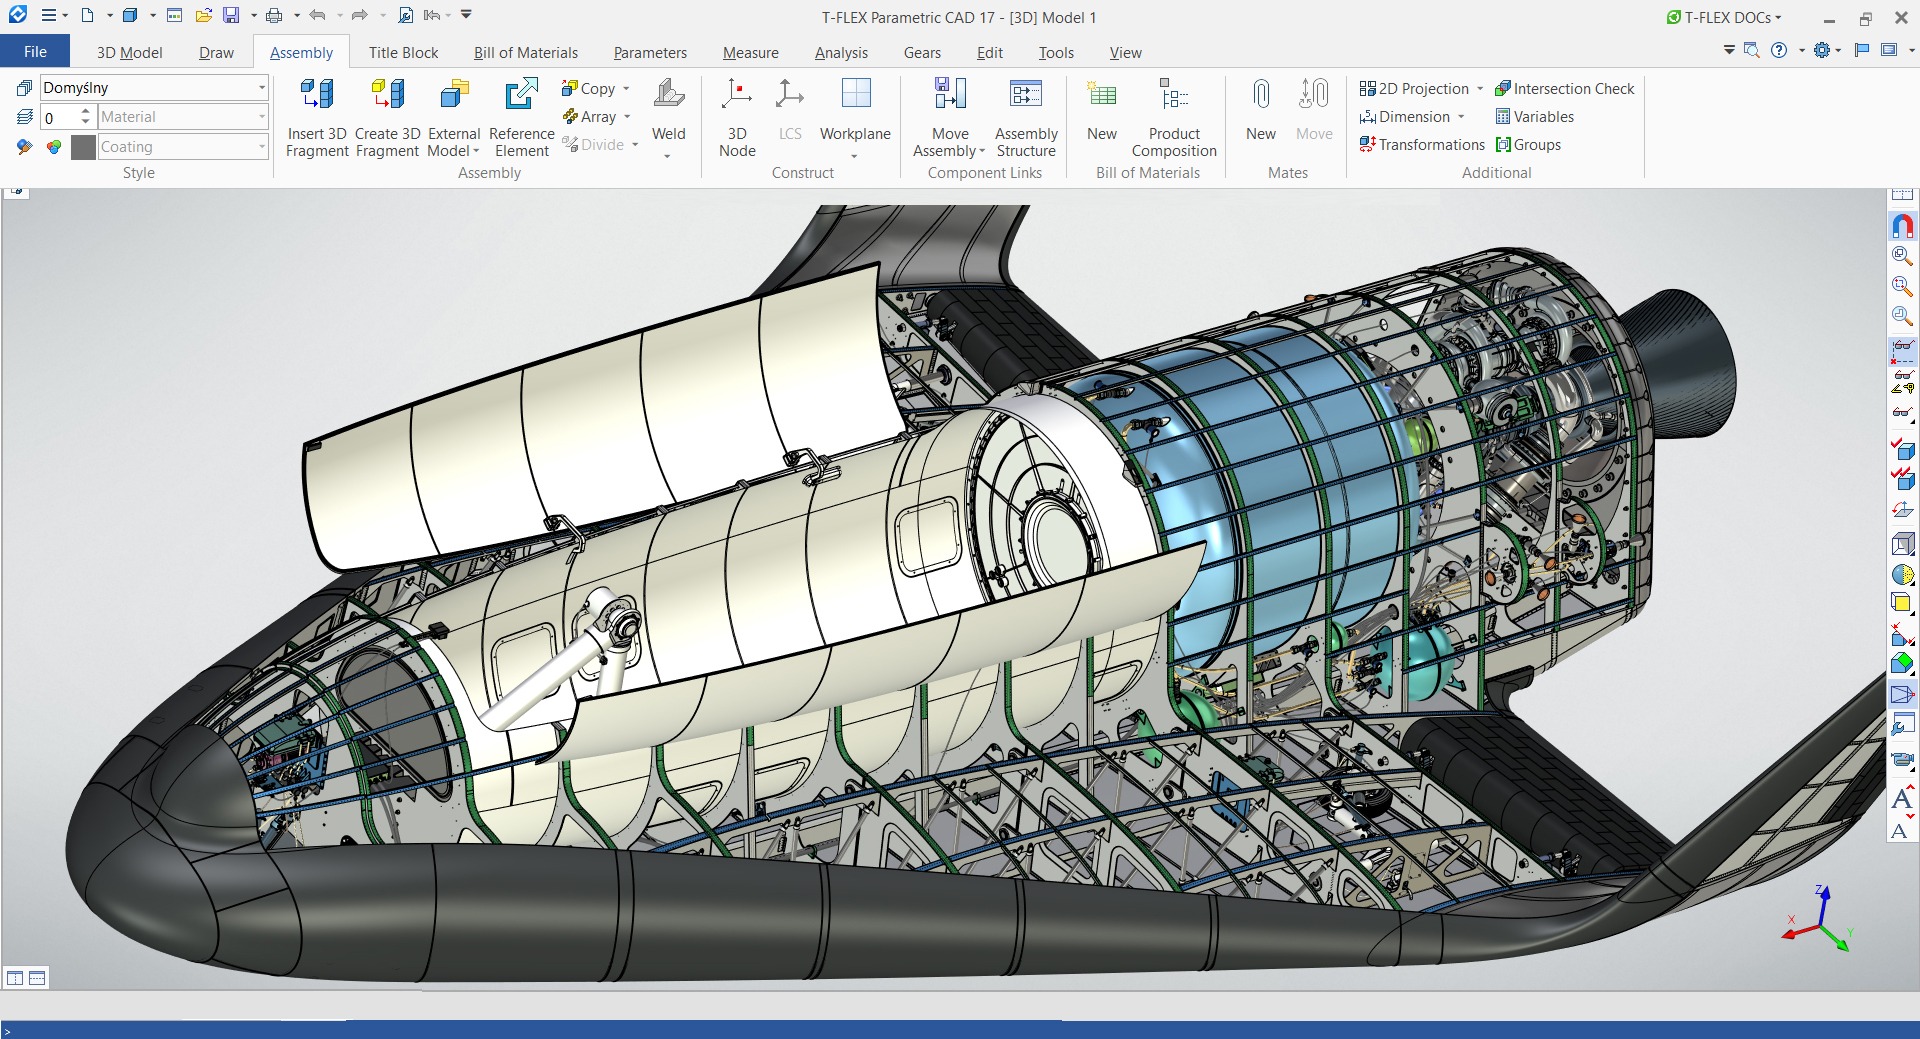
Fig. 6. Spacecraft without the upper skin, insulation and heat protection
Riveting holes in ribs were drilled-out with referencing to holes in spars, using the Hole command’s coaxial holes creating feature. Holes in frames were positioned by coordinates on spars.
The wing bend section spars were modeled in a rather original way — they were cut off by a plane based on paths constructed using isoparametric curves.
The wing leading edge, whose modeling took a significant part of the time, is especially worth mentioning (Fig. 7).
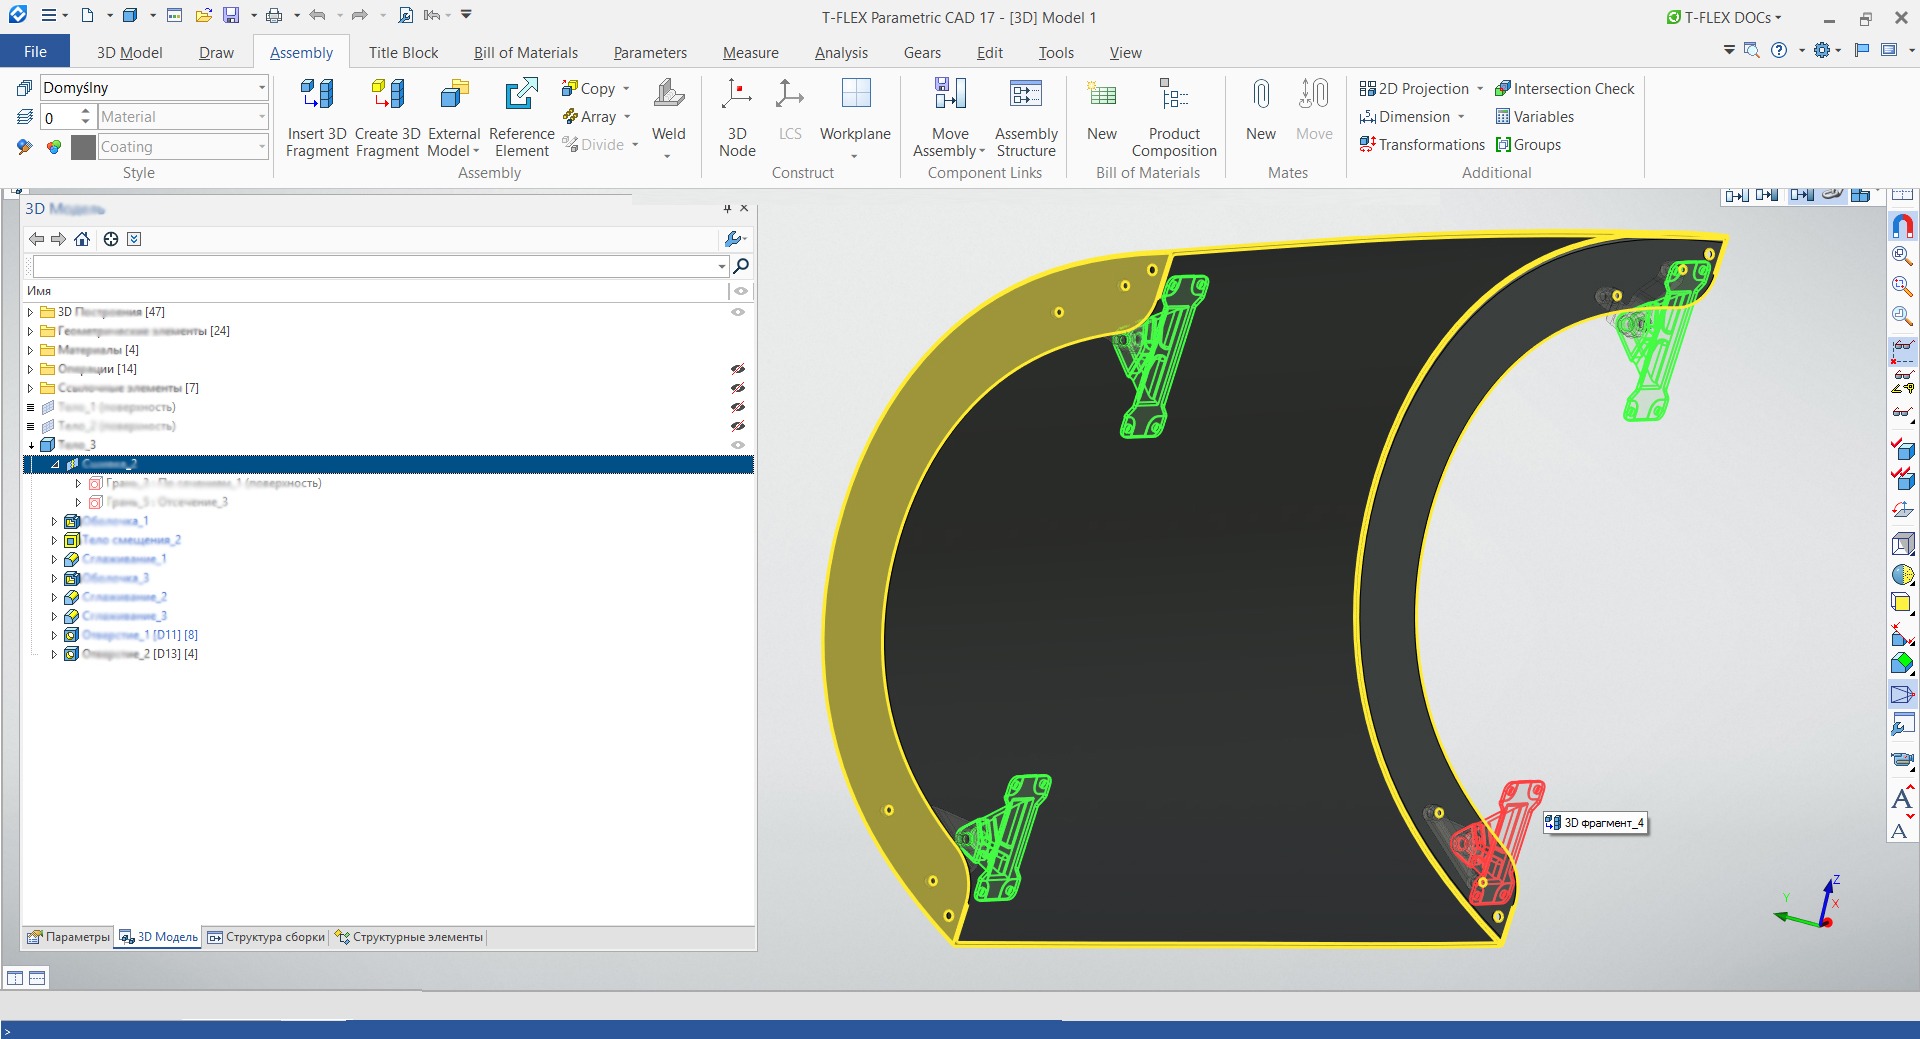
Fig. 7. Section of wing leading edge
The wing leading edge is a set of non-trivial assemblies of sections marked along the general contours, but attached to the first wing spar through special steel brackets, the layout of which was selected manually in order to ensure the assemblability of the structure and the possibility of replacing sections in case of deformation or wear. Special inserts are provided between the sections, and access cut-outs are provided in the wing spar. There are also some differences in ways of attaching heat-resistant sections to the spar, to the titanium plates of the nose skin and to the composite dome of the nose fairing, but this was done not so much for engineering reasons, as for mastering techniques of working with large assemblies.
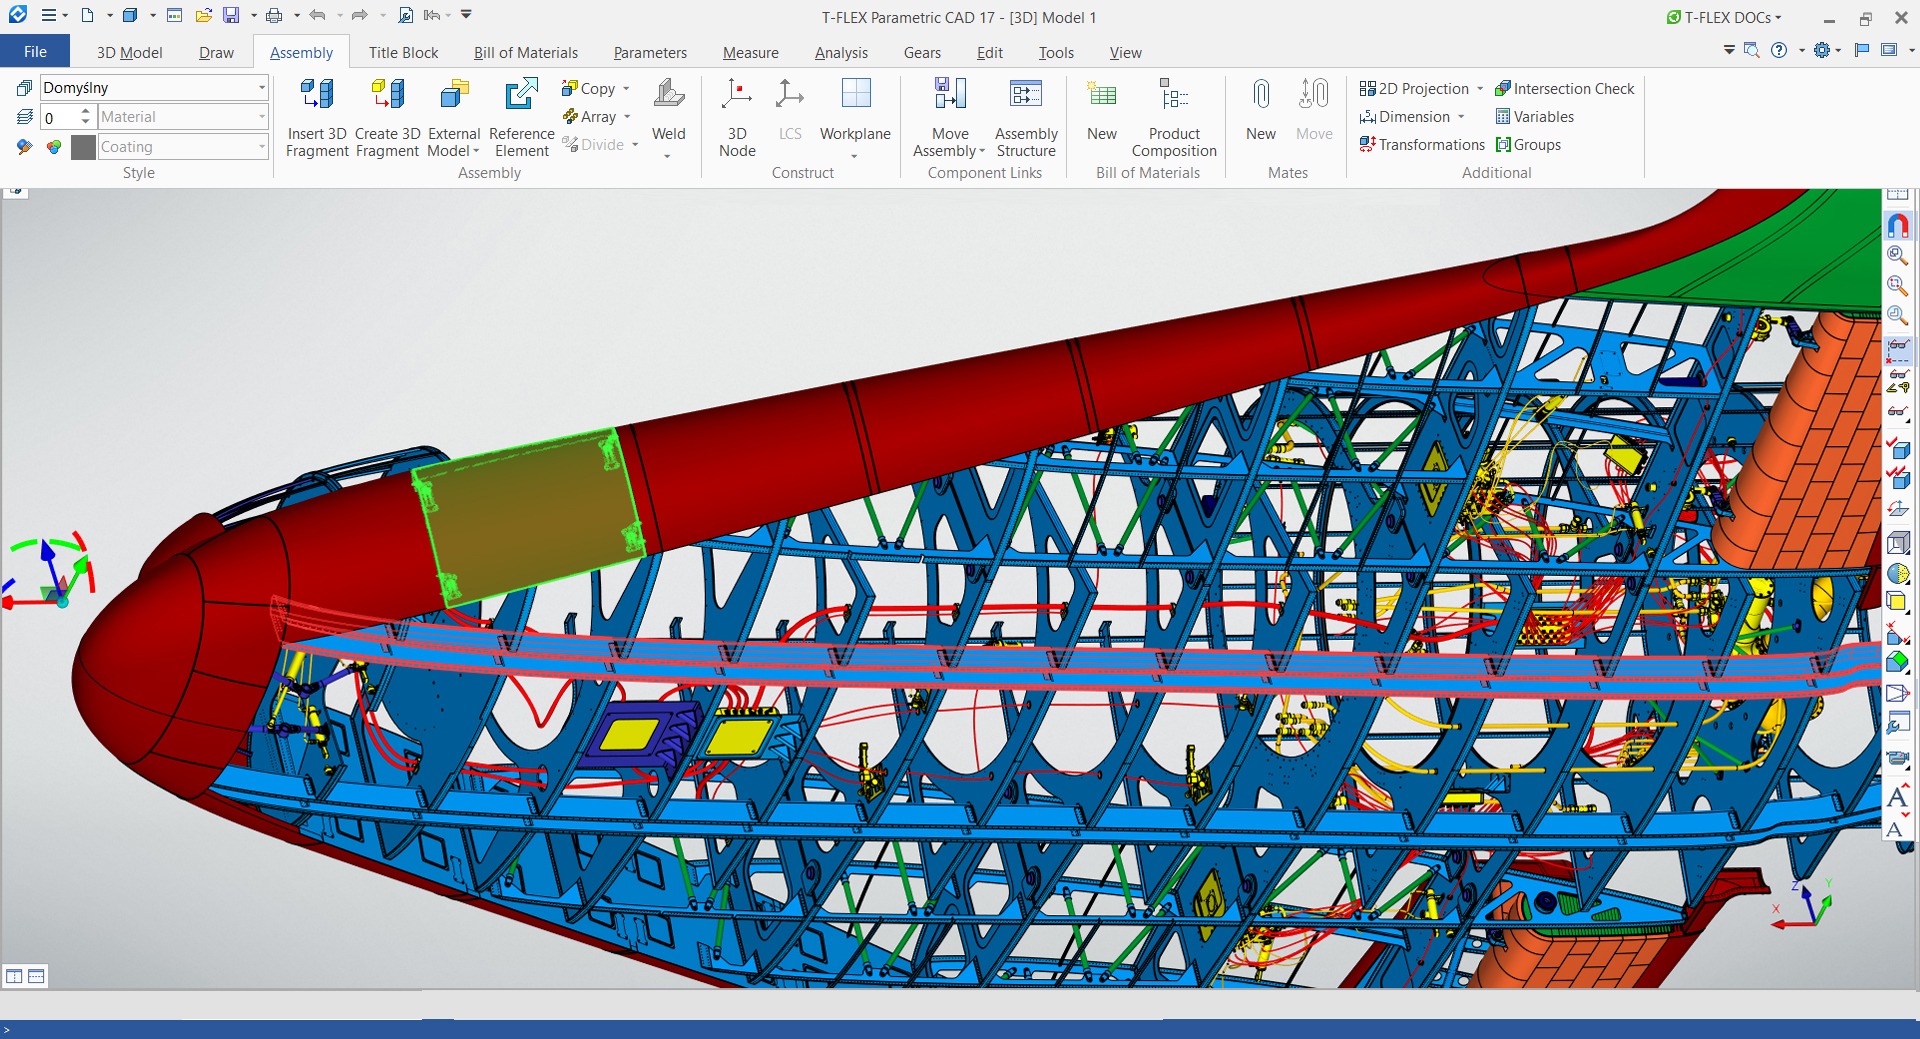
Fig. 8. Highlighted section of wing heat protection
In the atmosphere the spacecraft is controlled using rudders and elevons. The latter combine functions of elevators and ailerons.
Flight control surfaces are similar to the ones used in airplanes in terms of 3D modeling methods, but have some distinctive design features: layout geometry is created considering the offset for insulation and heat protection, the structure is filled with honeycomb filler consisting of over 8 thousands of elements.
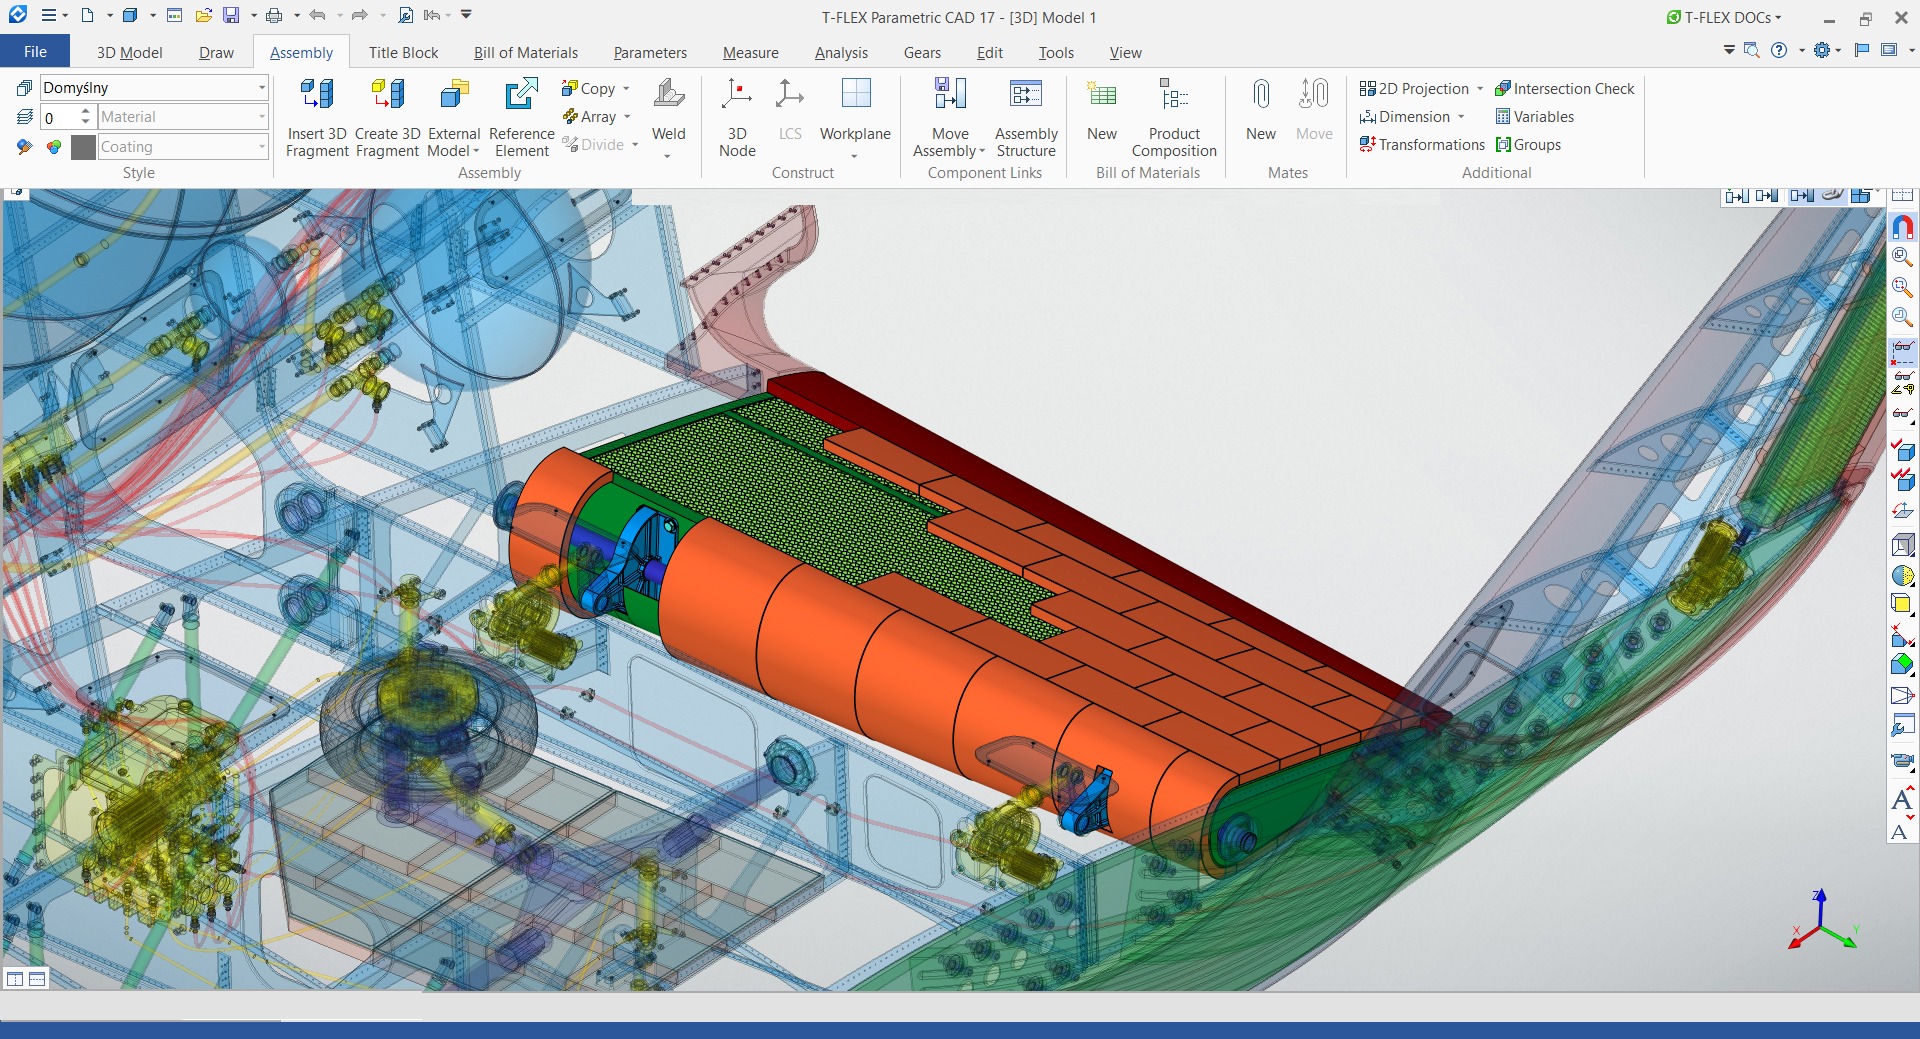
Fig. 9. Elevon in context of assembly
The fuel system includes fuel tanks, oxidizer tanks, pressurization tanks and the system of valves (Fig. 10). Main tanks are attached to special brackets consisting of trunnions and struts - their mutual arrangement was marked out in advance. Parts of the tanks are, usually, simple models made by rotating a profile around an axis. The engine was created by modifying the previously modeled two-chamber engine similar to RD-180 into a single-chamber version, which required editing most components and parts and re-routing pipelines.

Fig. 10. Engine unit and tanks of the fuel system. Airframe is omitted.
Aft panel screening the nozzle of the main engine is a rather “heavy” model consisting of 86 geometrical operations: base geometry was cut-off and then finalized using such operations as Shell, Offset Body, Blend and Hole (Fig. 11). The model is attached to the rear frame via studs screwed into special pressed-in bushings. It also has holes with steel bushings for the installation of a two-piece casing, which ensures the replacement of the engine at the end of its service life by a team of skilled workers.
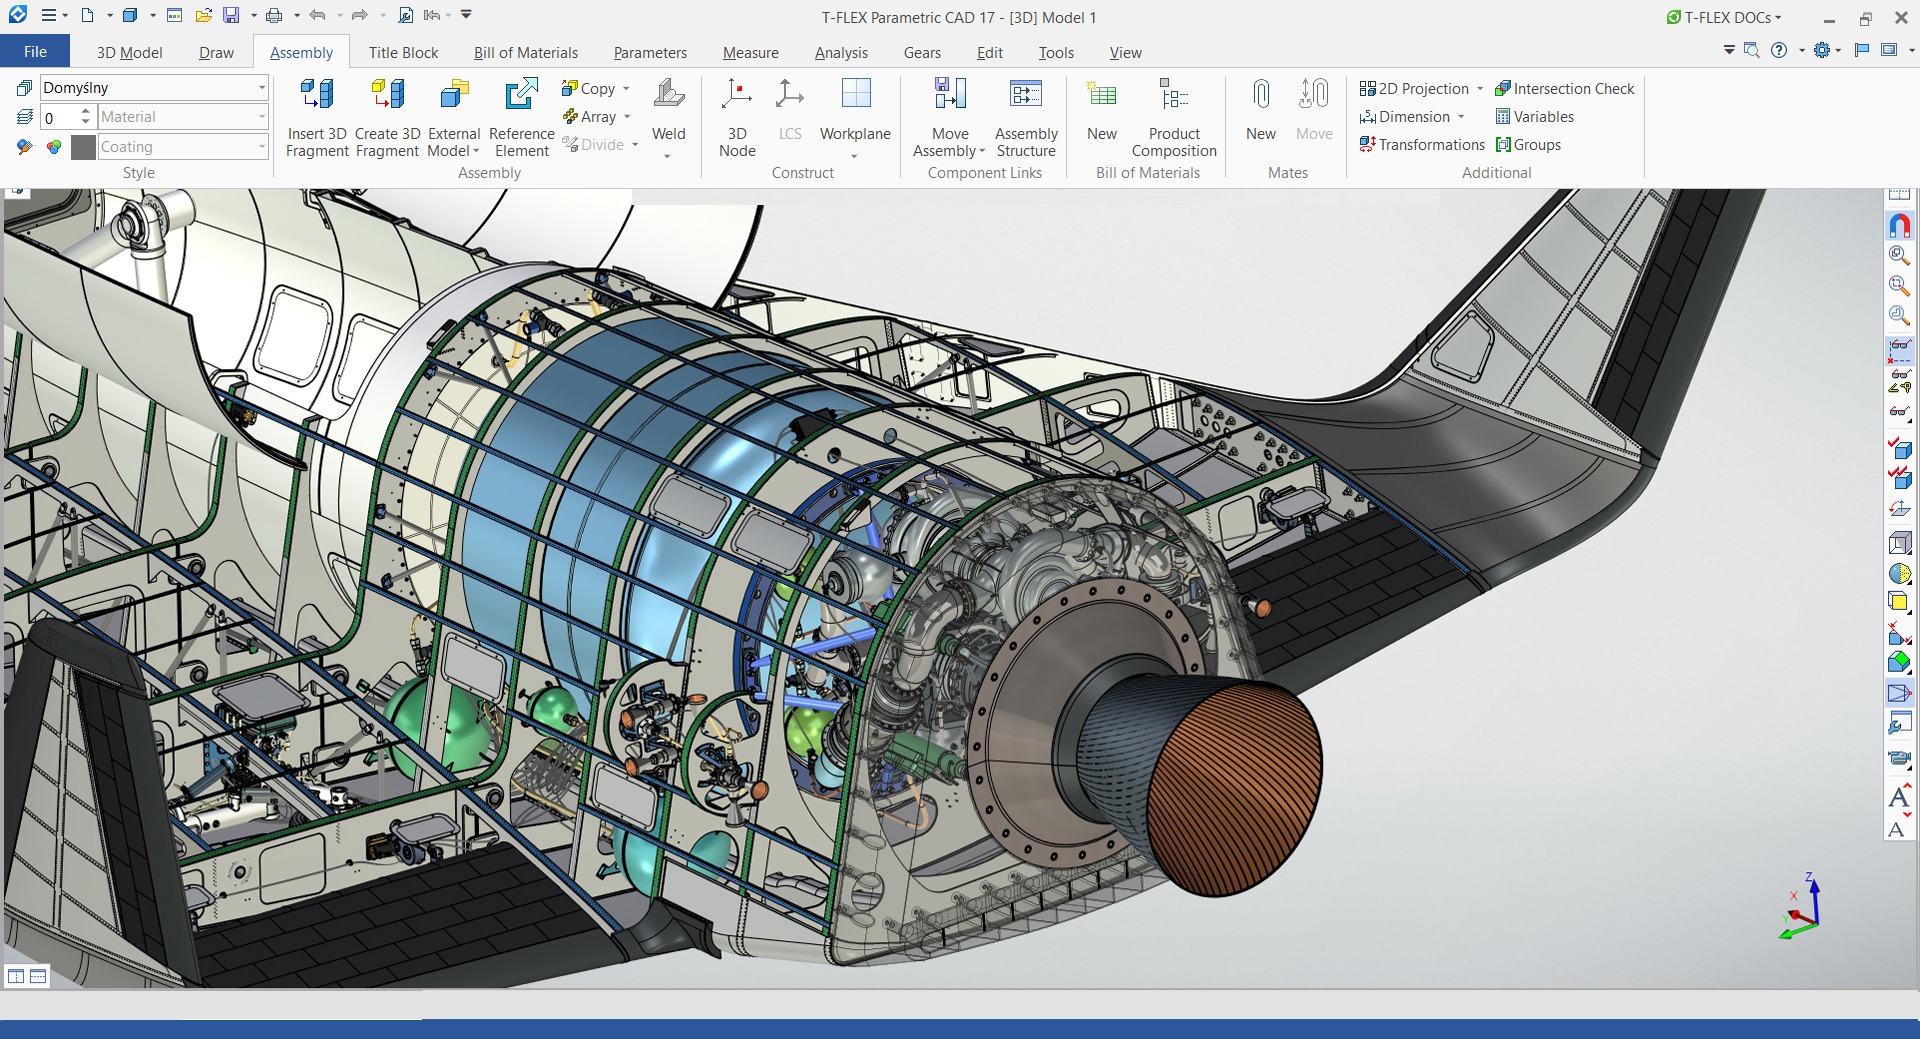
Fig. 11. Engine unit viewed from behind with hidden skin
Thrusters’ nacelles, in addition to two frames, consist of three skin panels: two composite and one aluminum (Fig. 12). A set of simple engines running on single-component fuel is used for attitude control. Accordingly, separate tanks with a pressurization system, piping and electrical wiring, as well as control valve units, were also made for them. Moreover, the front thrusters’ safety cover has the specially designed opening mechanism.
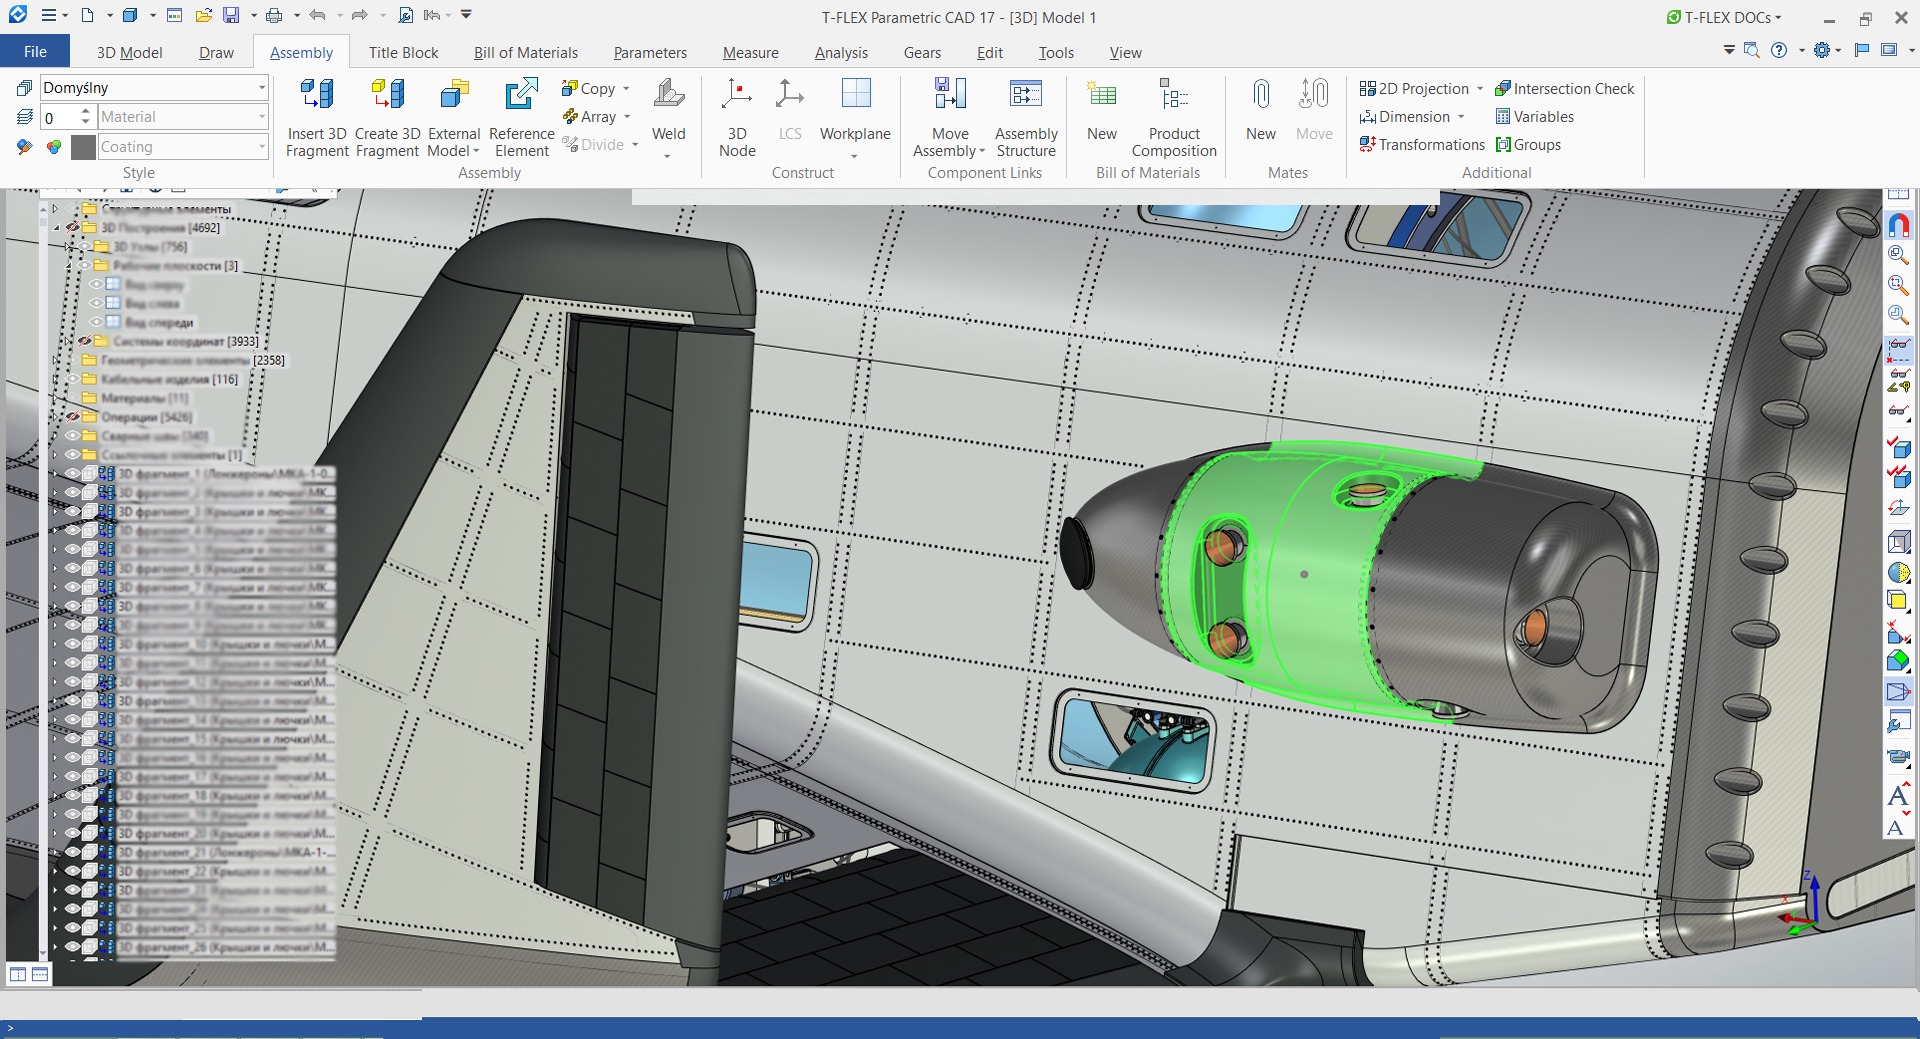
Fig. 12. Thrusters nacelle
Fuel and auxiliary hydraulic systems piping was created using the standard mechanics of laying pipelines along routes. The electrical wiring was fully designed using the T-FLEX Electrical application (Fig. 13). It utilizes modified library connectors plugged into electrical units directly in 3D scene with subsequent editing of the wiring path through the compartments. Special brackets with external support 3D nodes attached to the airframe elements were prepared in advance for wiring installation.
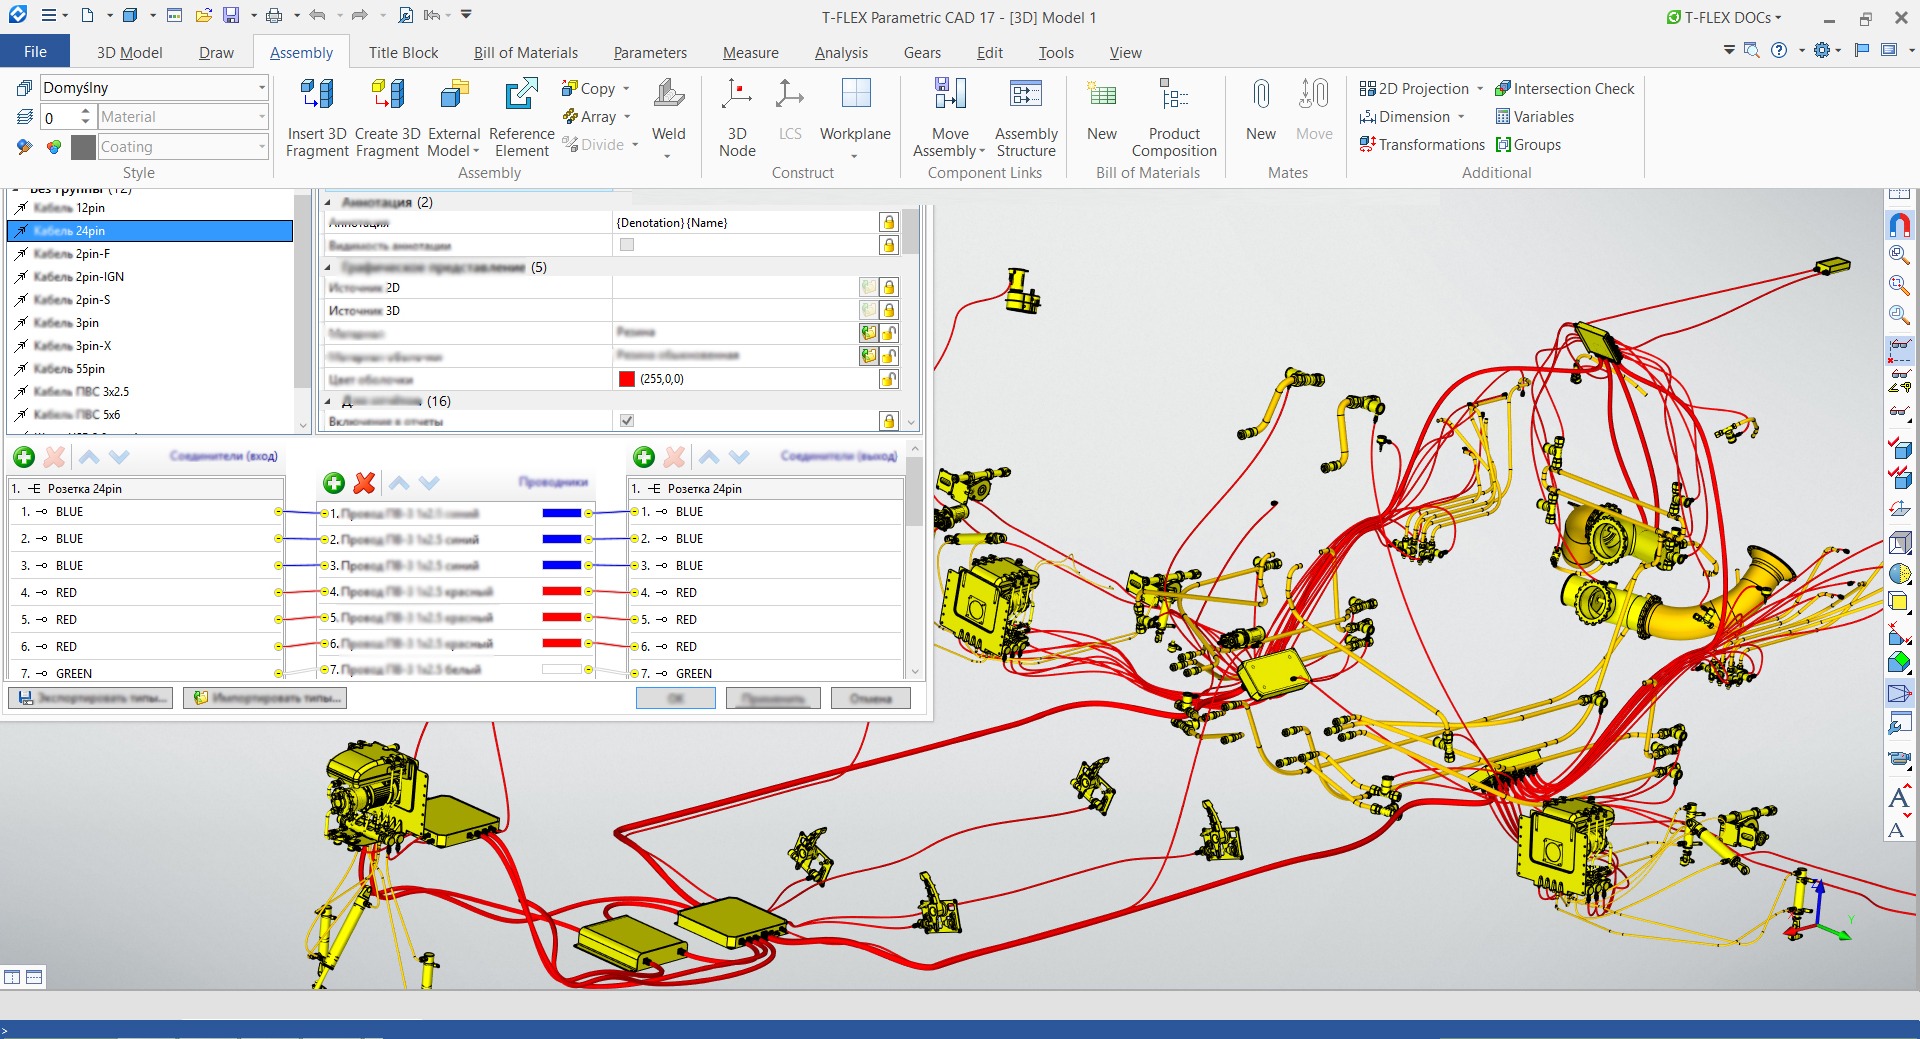
Fig. 13. Wiring, pipelines and the T-FLEX Electrical window
The landing gear was redesigned from an airplane, but the mechanism for opening the gear bay doors was modified taking into account the thickness of the skin, as, in the case of a spacecraft, there is also a relatively thick layer of heat protection tiles on the door. Moreover, compact drive units were assembled for the landing gear (Fig. 14), consisting of the electric motor, hydraulic distributor, tank and valve unit.
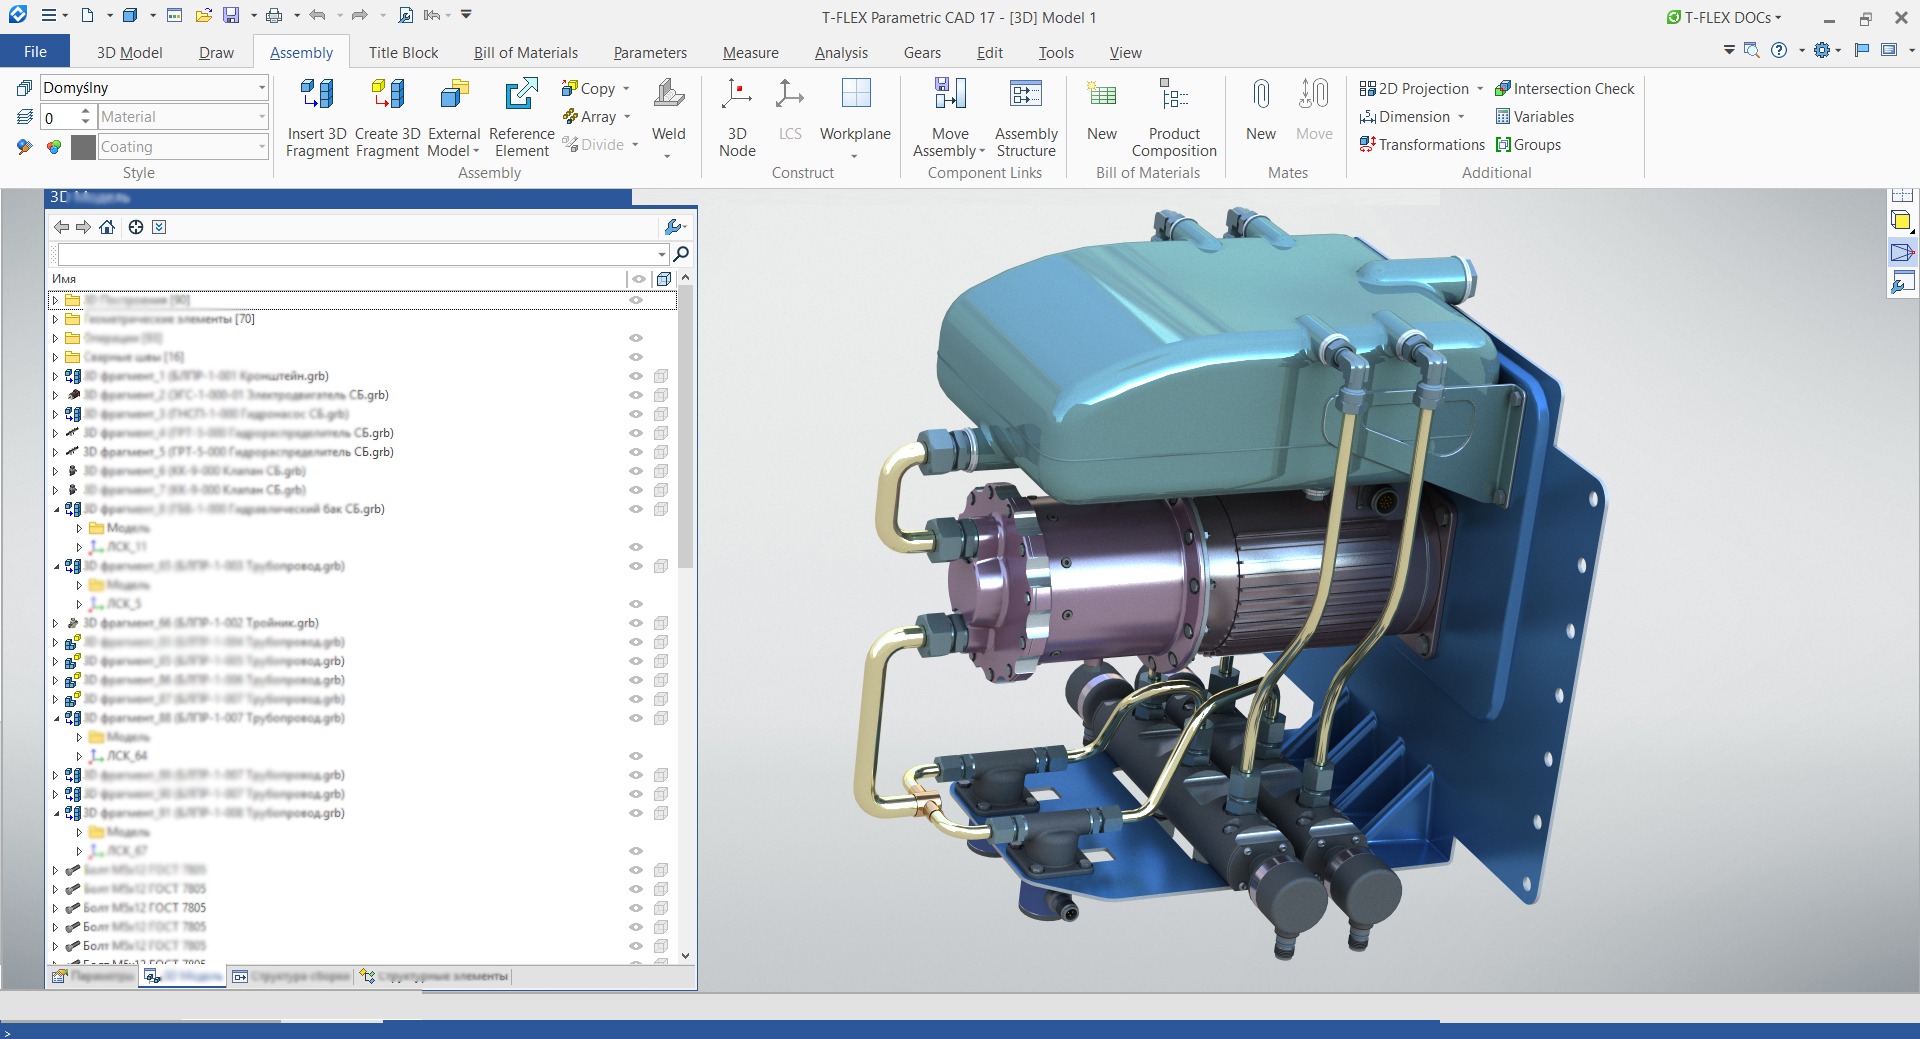
Fig. 14. Photorealistic view of the actuators unit
Manipulator for deploying the payload was created in advance (Fig. 15) separately from the rest of the spacecraft and later modified for mounting within the cargo bay. Several variants were created with different lengths of rods and inverted grip; manipulators were placed for convenient rotation of the rods to the desired angle. In the basic model, the manipulator arm can be folded using a variable.

Fig. 15. Manipulator in context of assembly
The skin made of aluminum sheet (Fig. 16), of course, was also cut from the layout file, and the Offset Body command was used for setting the offset from the base surface. Numerous riveted seams were implemented through reference geometry. The basic geometrical elements for a seam - a 3D path and the first 3D node on it, were taken from the corresponding airframe element. Next, the seam itself was formed, using the Array by Path command and Holes by array. Cut-outs were made in skin panels for landing gear bay doors, access hatches, etc.
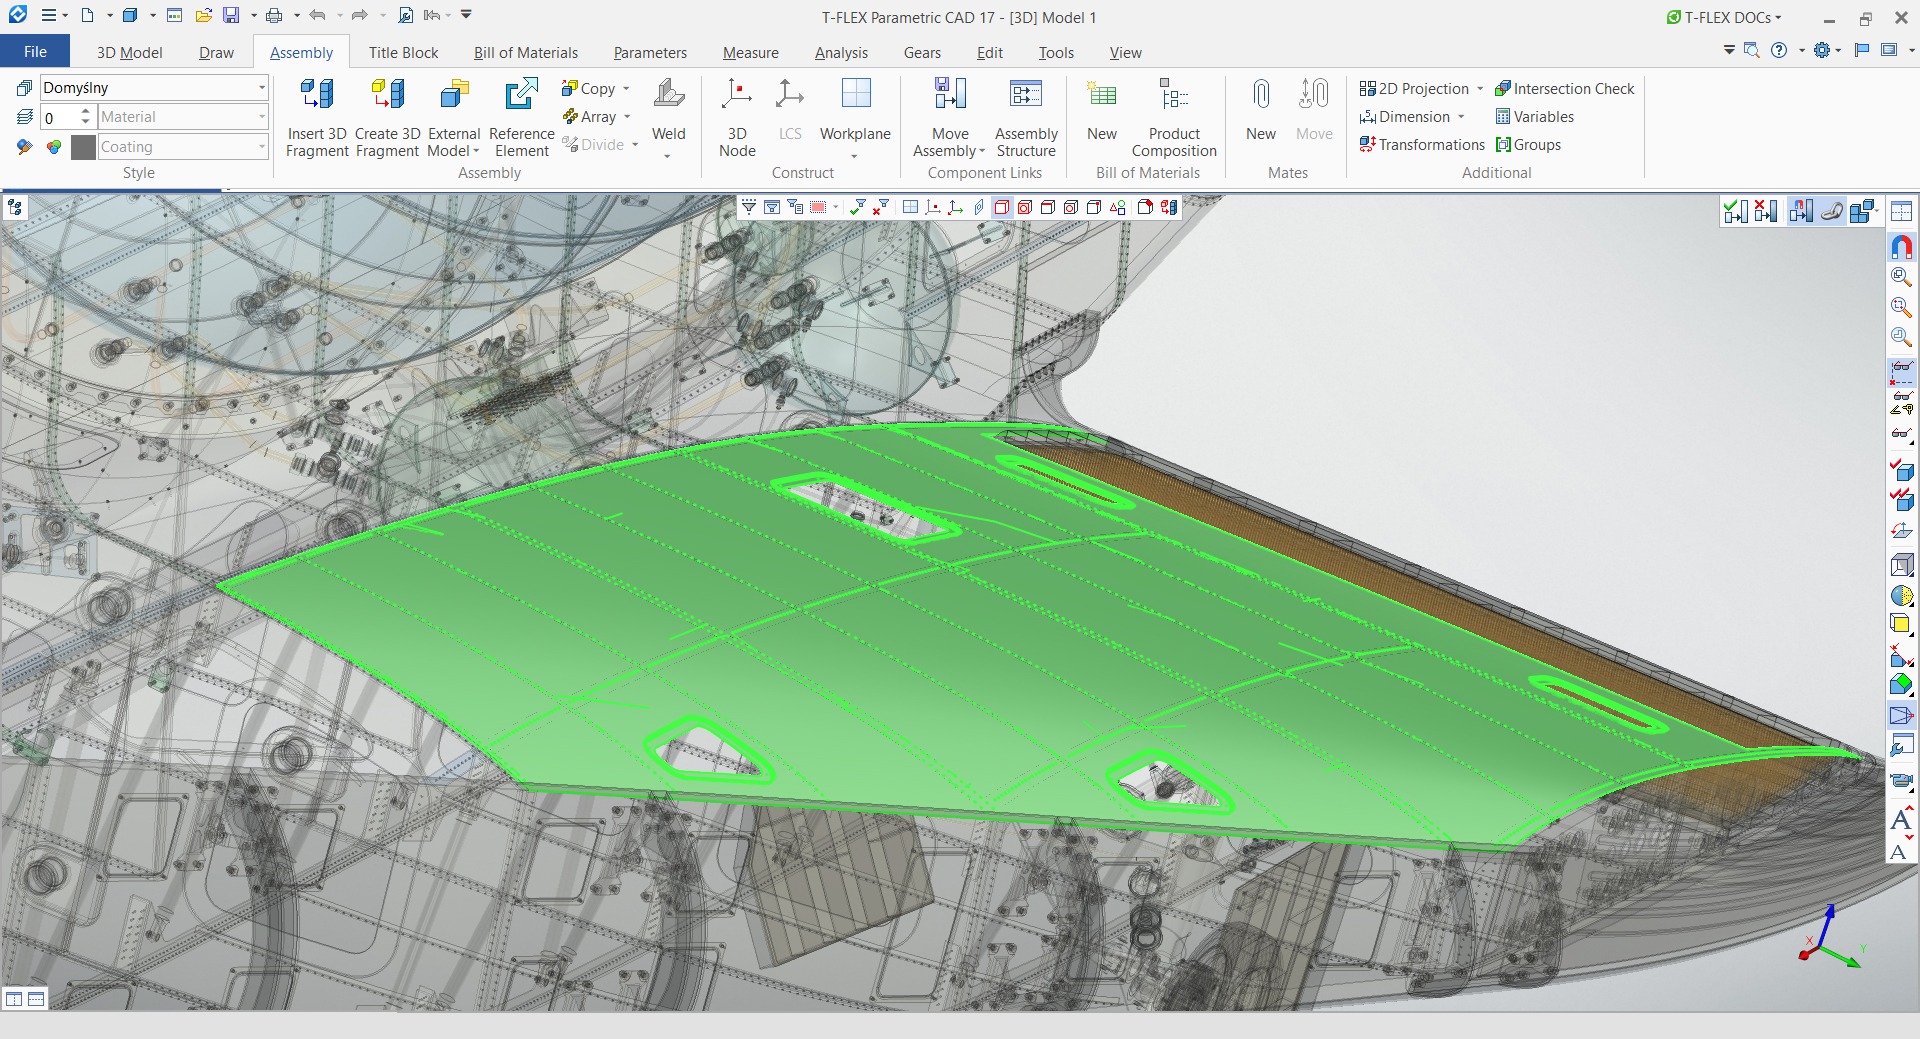
Fig. 16. Skin panel in context of assembly
Some hatches should be recessed into curved panels. Cut-outs for such hatches were projected onto panel as 3D profiles, and then a recessed area was formed under the lid, using multiple Extrusion and Shell operations with specifying the required thickness of faces. A path for fixing holes drilling was formed, using the Offset Curve to 3D Curve on Surface command. This method has proven itself especially well, when working with panels made of composite materials.
A similarly modeled insulation layer was laid on top of the skin. On top of the insulation layer there are three types of heat protection: the thickest layer on the nose, as well as "under the belly" and below the wing. The heat protection tiles were cut individually: taking the symmetry into account, 1260 tiles were created. Of course, all layers of shells were formed with a pre-calculated value of the offset from the layout surfaces.
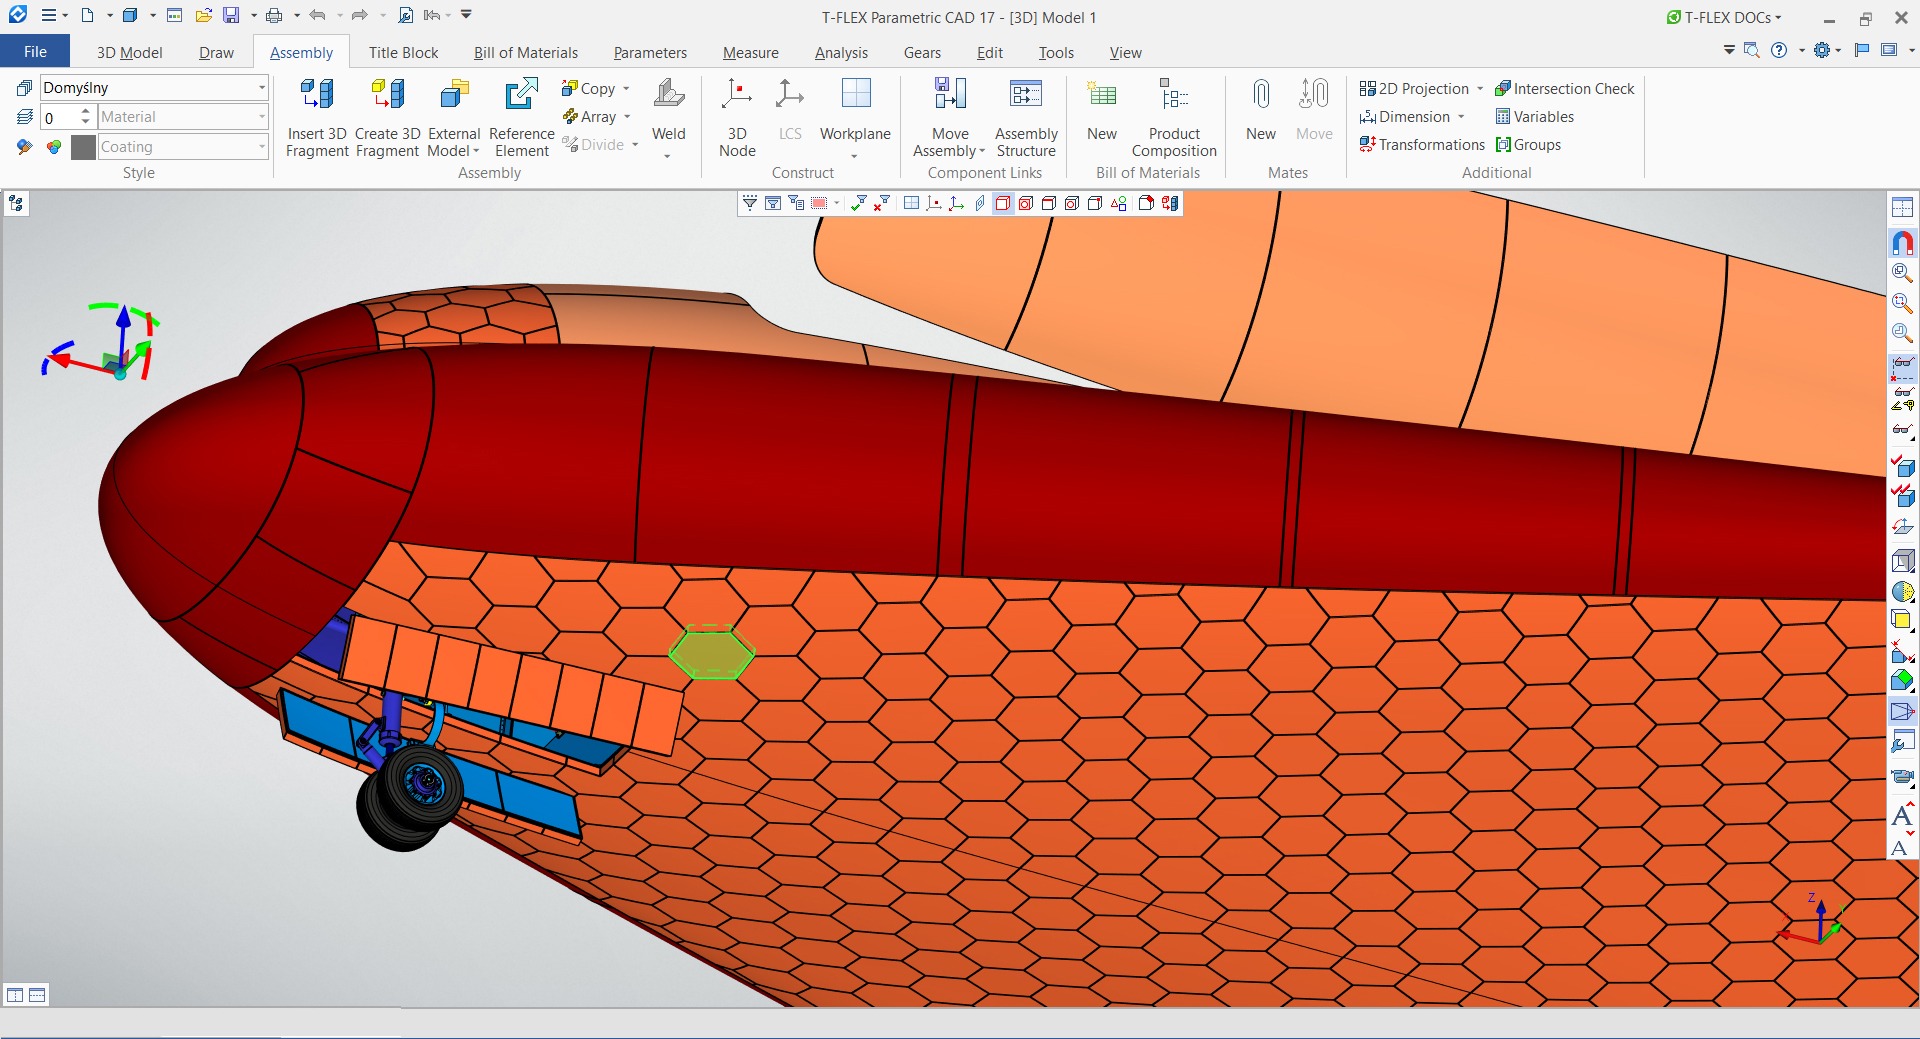
Fig. 17. Heat protection tile on bottom surfaces of the spacecraft
Rivets, as well as bolts fixing the front thermal protection sections, were inserted using the intelligent Array by Pattern operation, when the user specifies only one fastener and an array of holes for insertion, and the system automatically arranges fasteners throughout the model.
All fragments of the assembly were distributed between 21 layers for convenience of work and presentation (Fig. 18).
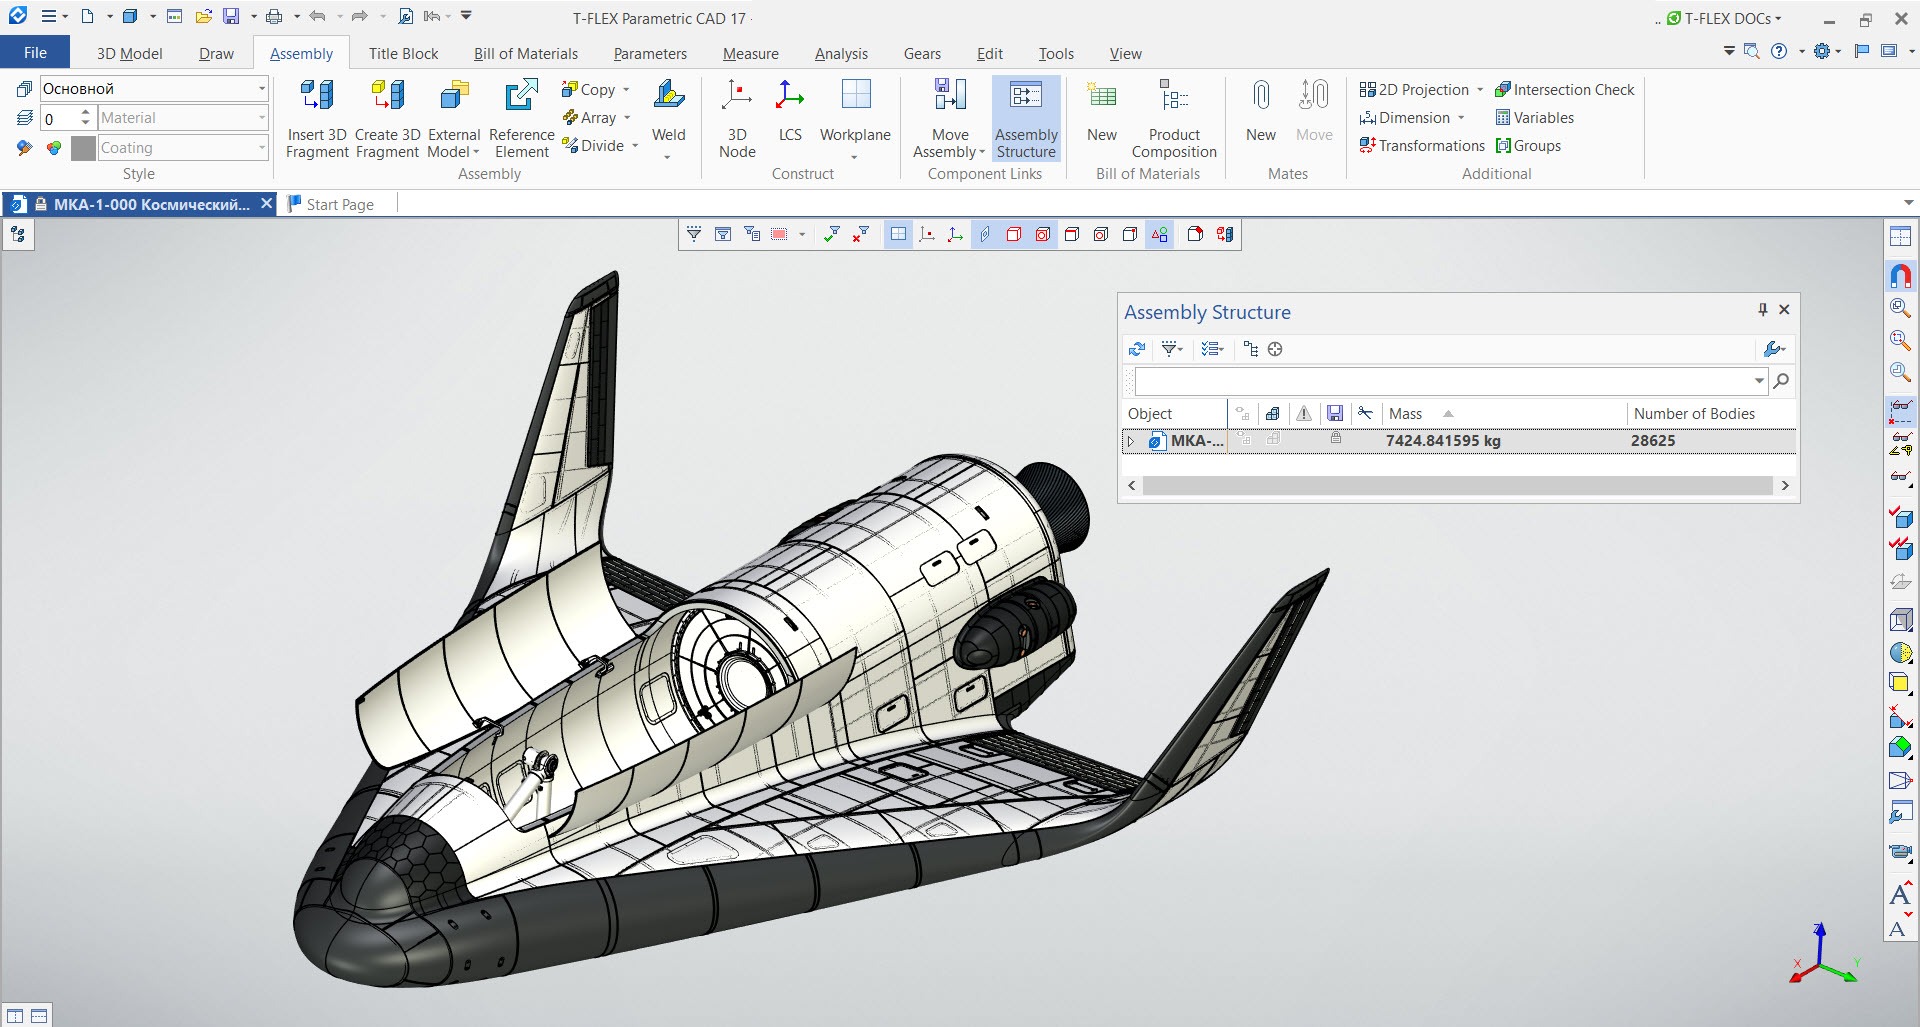
Fig. 18. Overall view of the spacecraft with closed cargo bay doors
In total, the model turned out to consist of about 28,600 bodies without rivets, or 72,640 including rivets. The configuration of the computer on which the work was performed: Intel Core i7 7700, 3.6GHz, 32 GB of RAM, NVIDIA GeForce GTX 1060 3 GB. The process of creating the model was a lot of fun and allowed us to better assess the potential of T-FLEX CAD for integrated work with assemblies of medium complexity.